Becoming Butterfly: the white satin yo-yo kimono

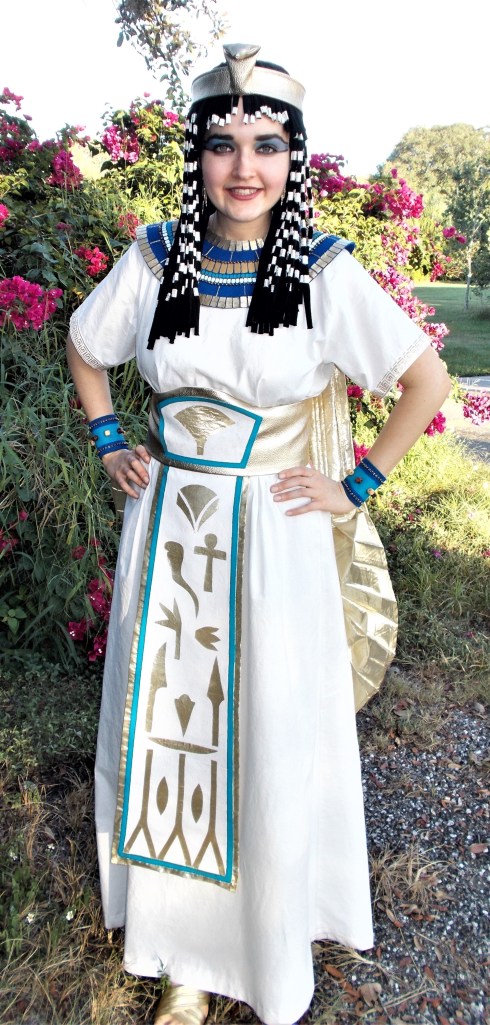
Madame Butterfly represents a “full-circle moment” for me: it was in 2016 that I taught myself to sew when I didn’t have anything in my closets to wear to the movie theater performance of the opera. Seeking anything that gave the impression of an Asian aesthetic, I wound up sewing a cotton yukata, which was the genesis of my sewing passion. New doors had been flung wide open !

Madama Butterfly (2016)

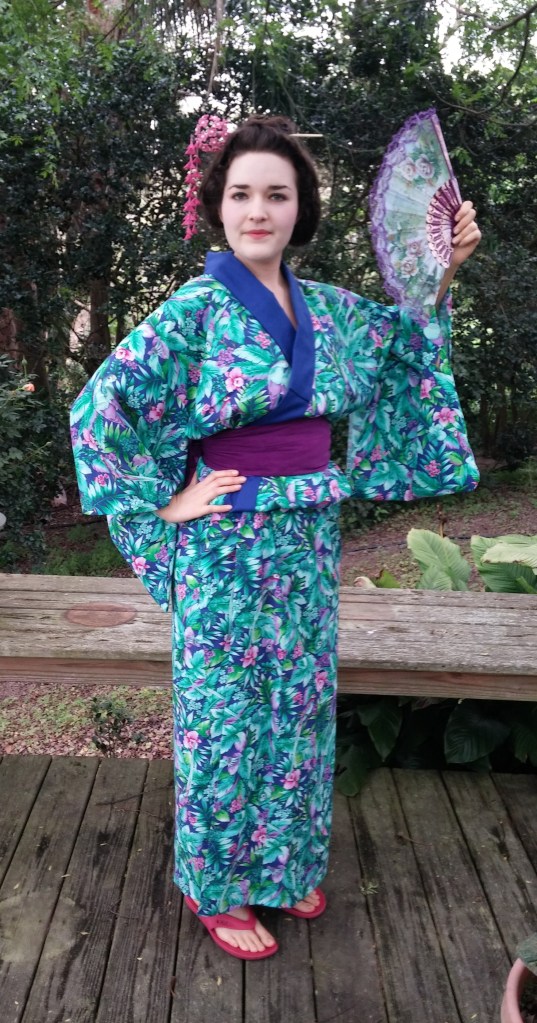
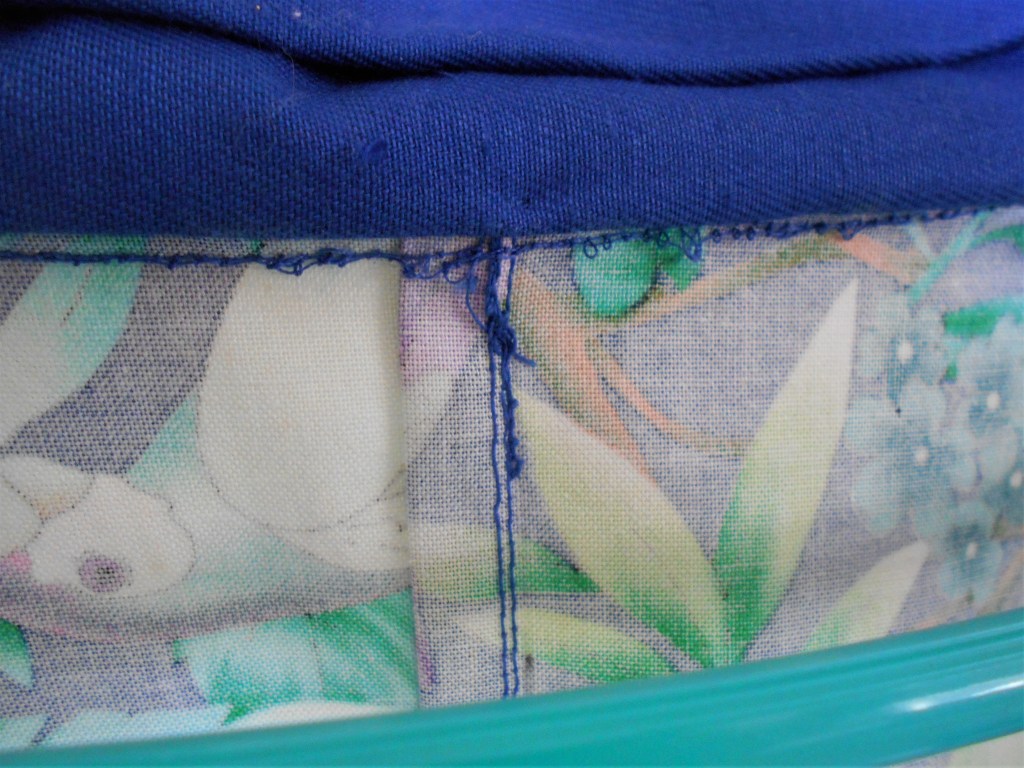
But it wasn’t a cakewalk. Despite the rather traditional manner in which the yukata was fashioned (save the contrasting collar ─ I ran out of tropical fabric !), my interior seams were horrendous ! Because of my previous ignorance of how to properly work a sewing machine, the bobbin threads are bunched and looped into chaotic cocoons, a sign of incorrect tension in hindsight. Although I was ashamed of how slipshod the inside of the yukata turned out, the disappointment was replaced by triumph as I overheard the whispers of a little girl to her mother about the “kimono lady” that silently slipped by in the theater. Priceless !

The novice’s stitches

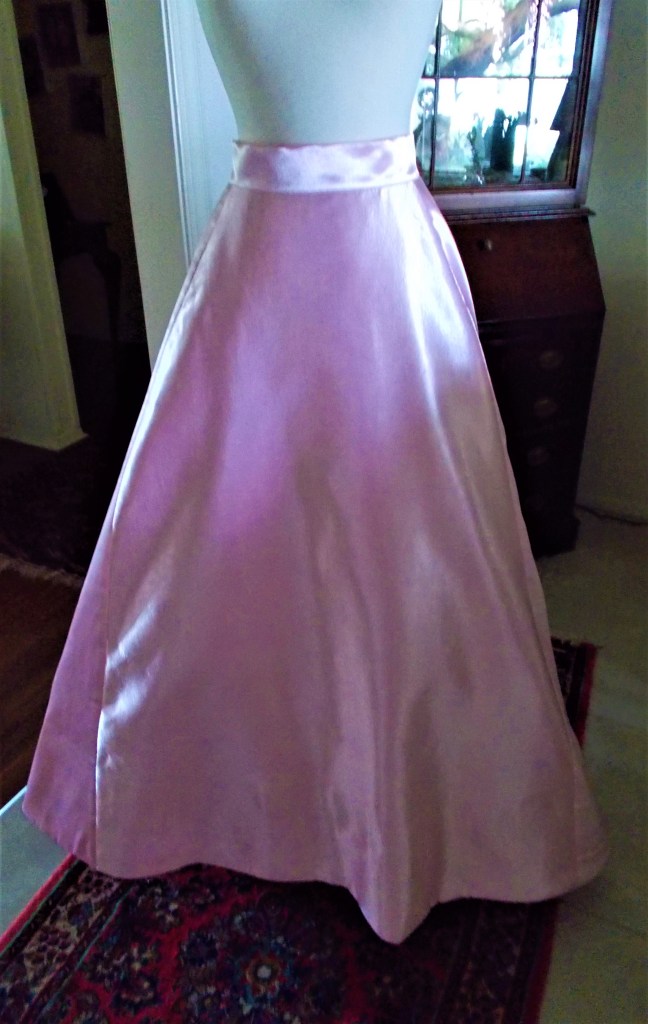
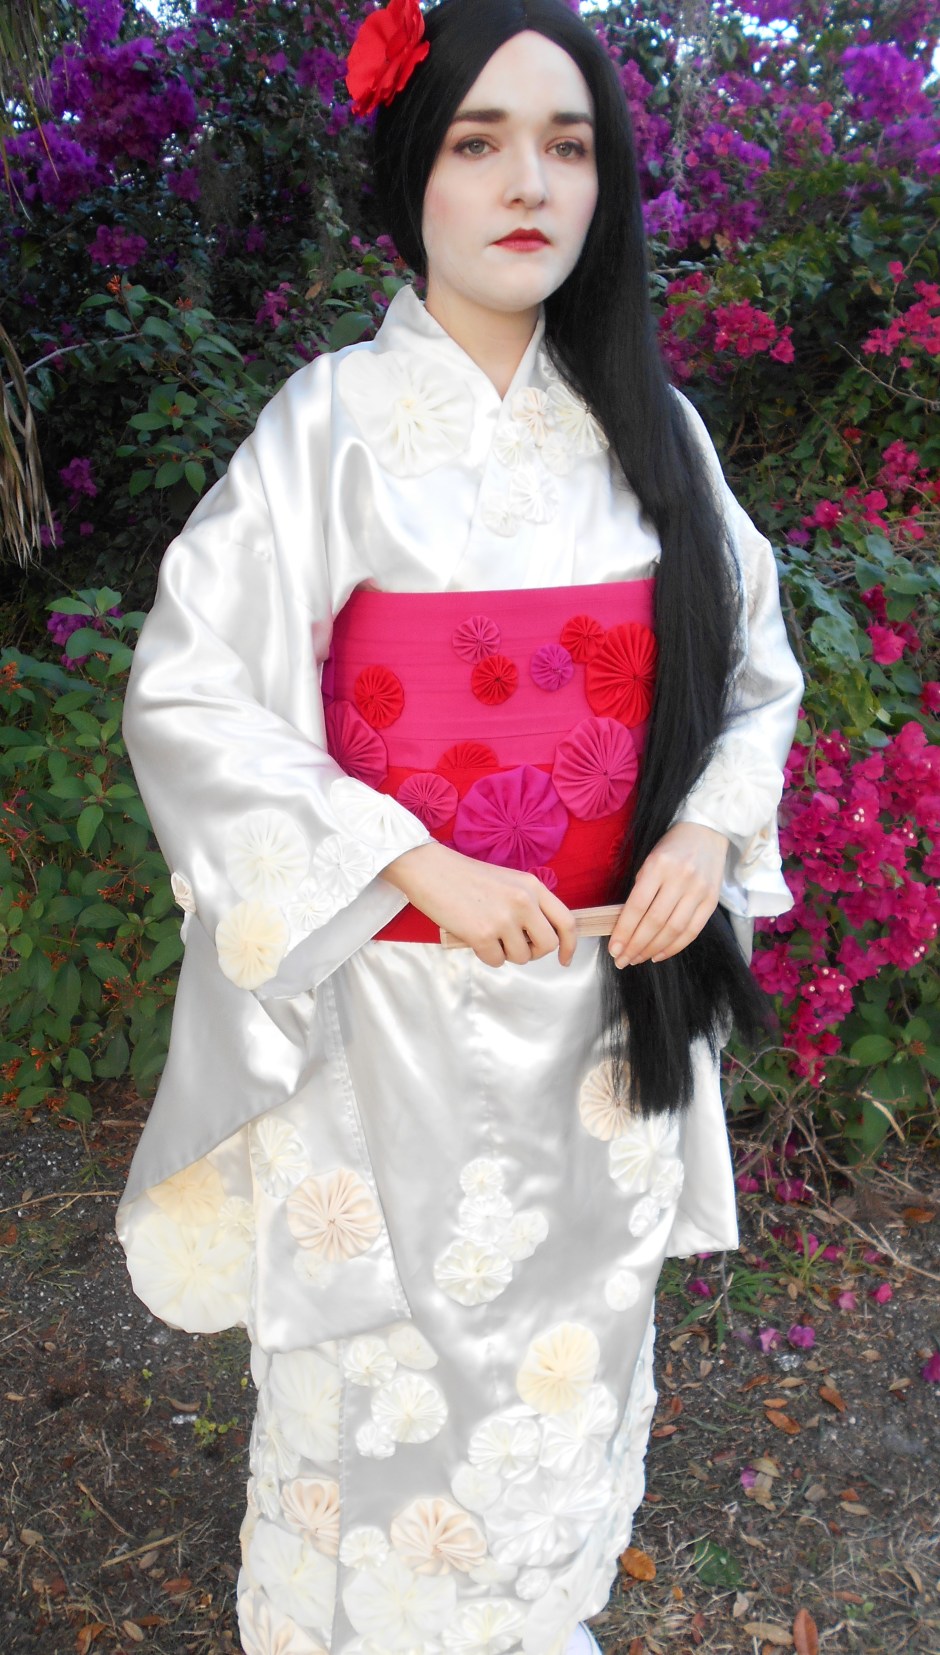
Over three years later, Puccini’s immortal opera returned to the Live in HD schedule for the 2019-2020 season. I knew I had to go. However, since my sewing skills had improved exponentially, I wanted to create something that was more suited to the Anthony Minghella production’s styling of Cio-Cio-San. A wedding gown was in the works…

A scene from Anthony Minghella’s production of Madama Butterfly / Metropolitan Opera

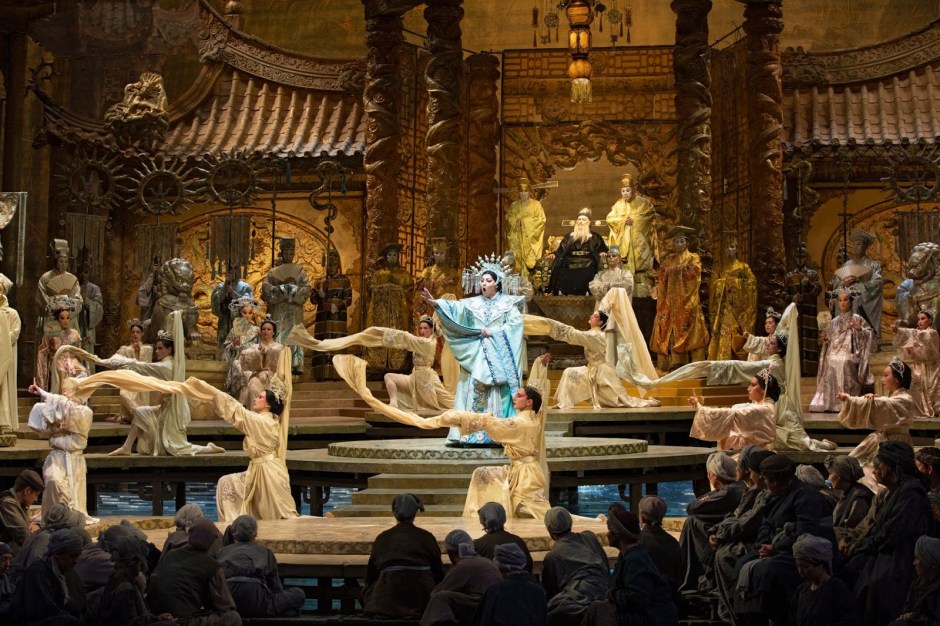
More specifically, a wedding kimono. Like a specter rising from the grave, the gossamer veils that clothe Cio-Cio-San in a milky moonglow is breathtaking. Without fail, I’m enchanted by the first appearance of the geisha climbing up the stairs with her wedding party. With the decision easily made, it was time for the research…

And there was plenty of it !

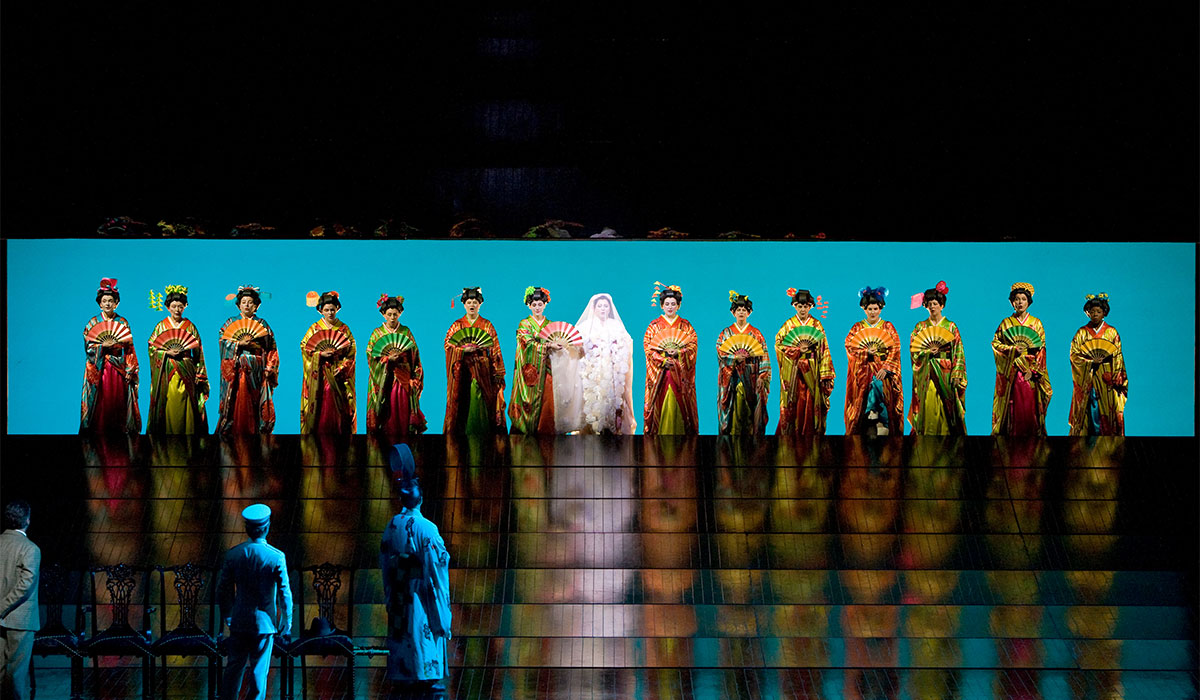
The aforementioned Minghella production has been a crowd-pleasing staple at the Met since 2006 with a plethora of sopranos playing the title role, from Patricia Racette to Kristine Opolais (who sung the part in 2016), to Hui He, singing in the 2019 Live in HD performance. A simple image search provided up close detailing of the white satin kimono and its sash.

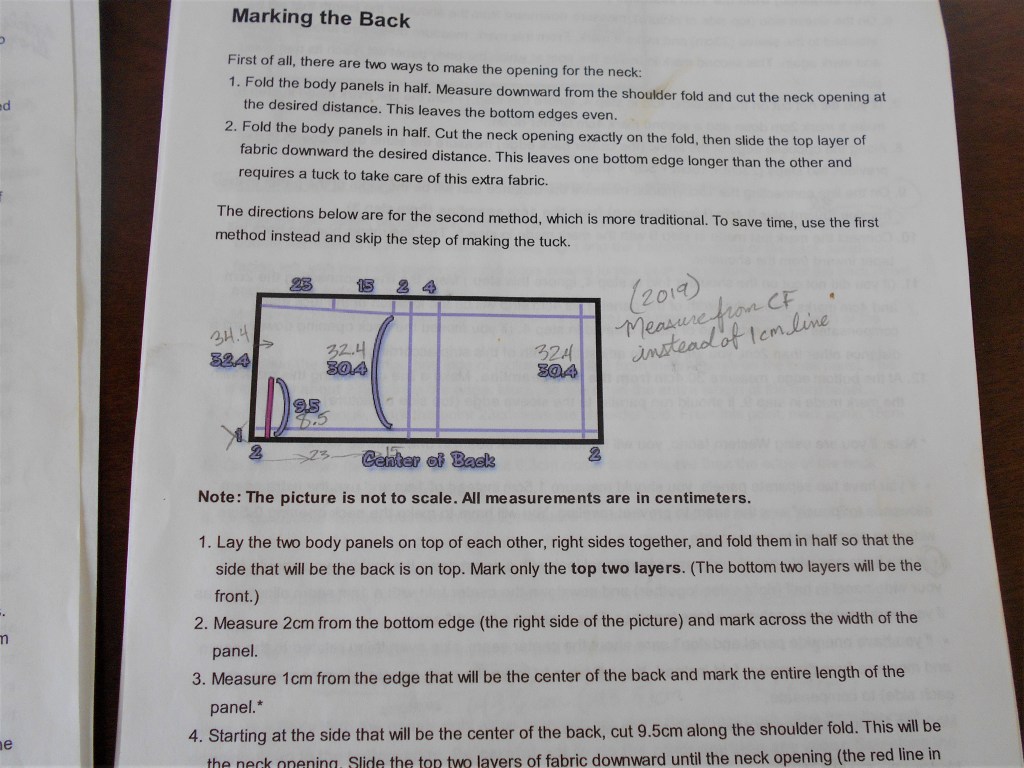
With the success of my tropical print yukata, I didn’t see any reason why I shouldn’t use the same pattern instructions, which worked so well in 2016. Look no further than this helpful site: http://www-personal.umich.edu/~weyrbrat/Japan/yukata/ I have all the pages printed out and stored in a zip top bag for future uses. The instructions are vivid, realistic, and accurate and equip sewers to create their own authentic yukata (or kimono) from scratch. Since I wasn’t aiming to create a historically/culturally accurate garment, I made my own adjustments to the notes and measurements that I wrote down in 2016.

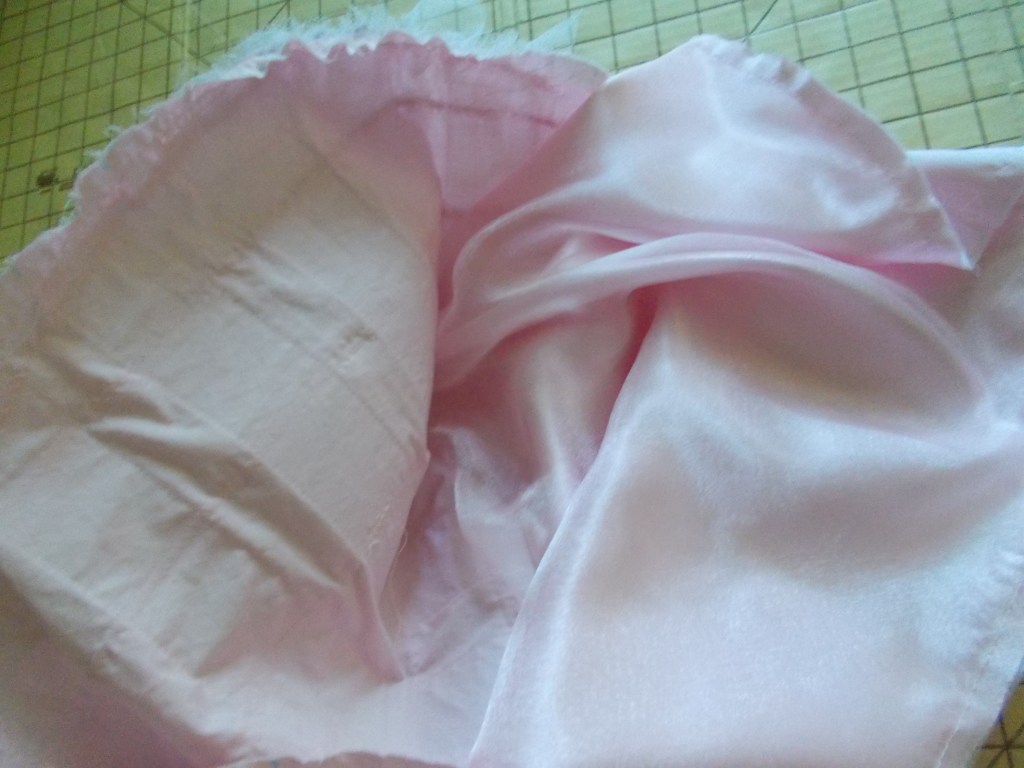
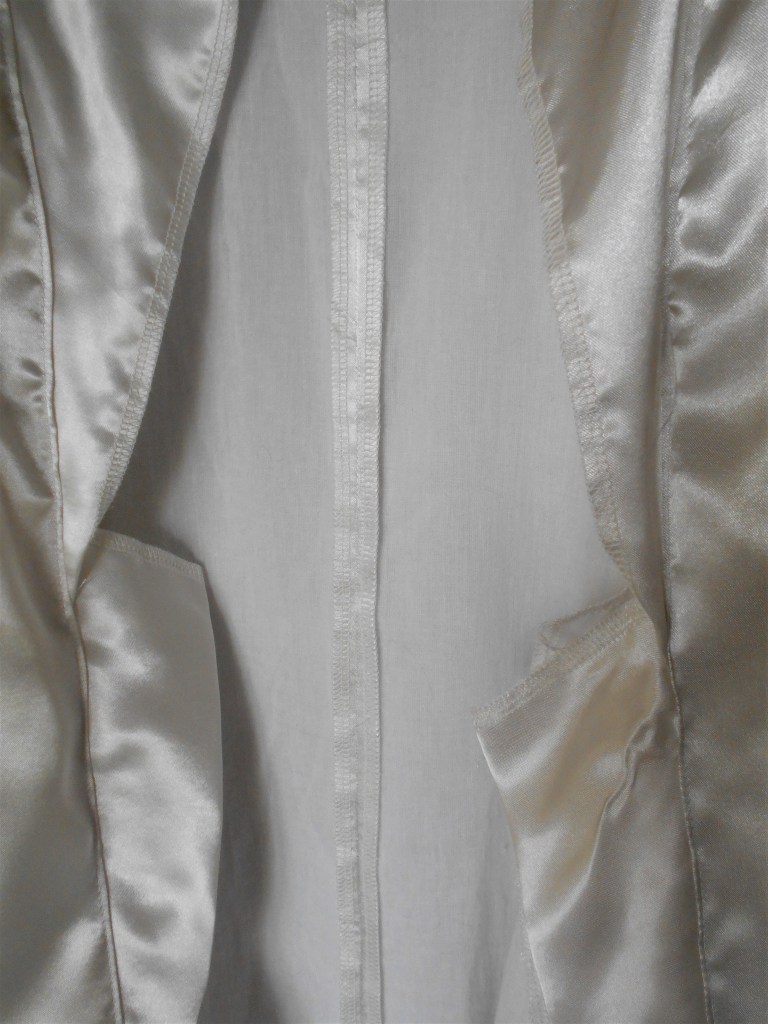
If there was one thing I learned during my time as a Valkyrie, it’s that polyester linings can act as saunas to my skin. Nobody wants sweat rolling down their back and besides, the silvery white charmeuse satin I bought was just a bit too see-through for my liking. It needed a lining ─ and a cotton one at that ! Cotton voile was the perfect choice.

Cotton voile lining and charmeuse satin serged together
The inside of the kimono ─ much cleaner seams than last time !

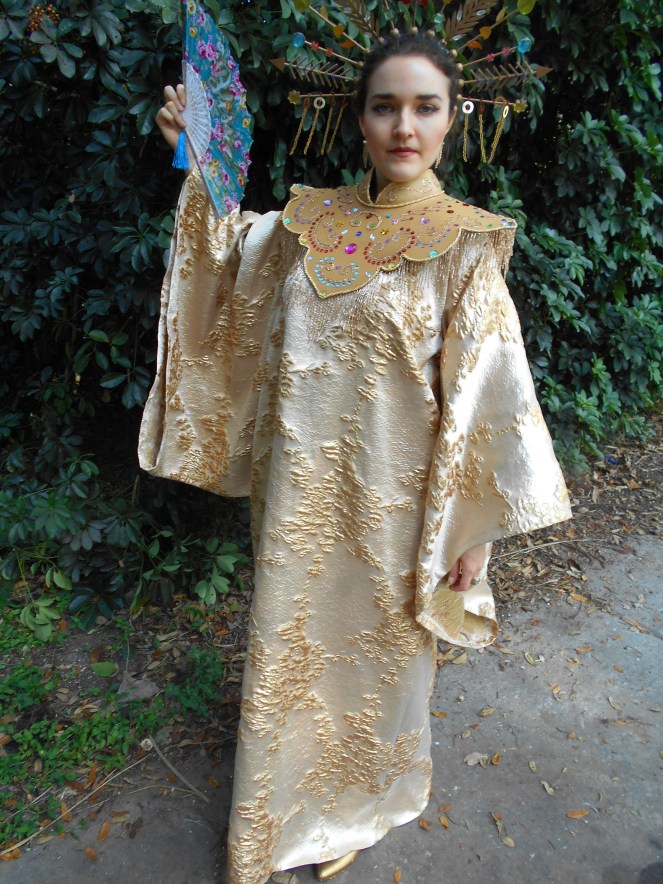
The construction of the kimono was easy enough, following the instructions as before, and now it was time to focus on the more thought-provoking elements of the costume… the sash and decorations !
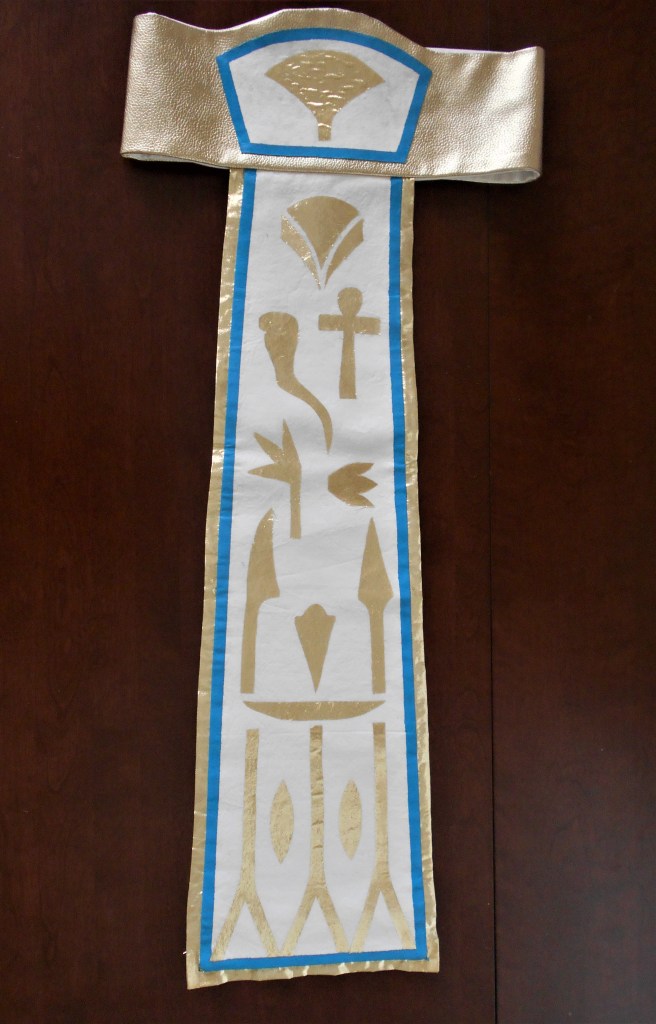
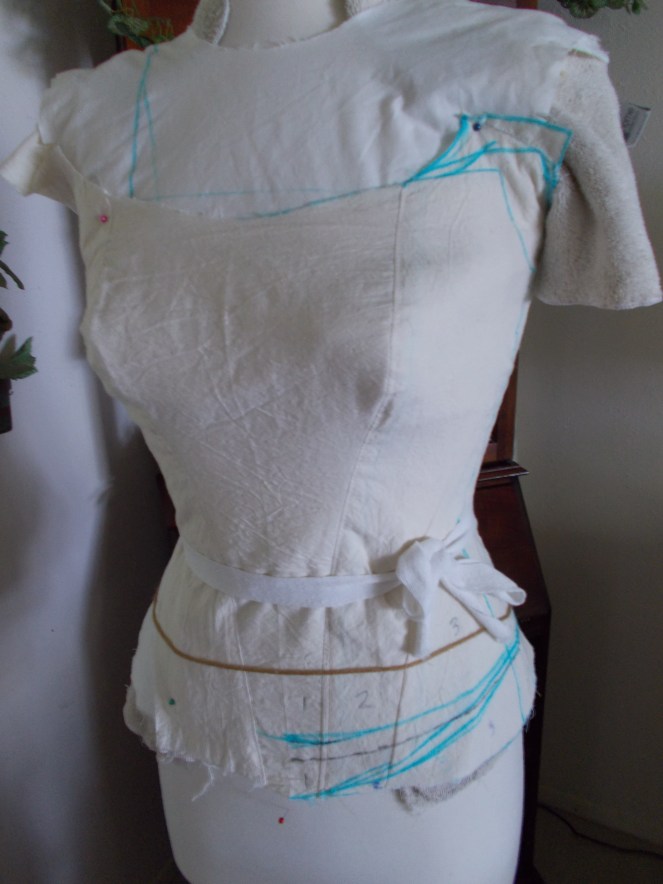
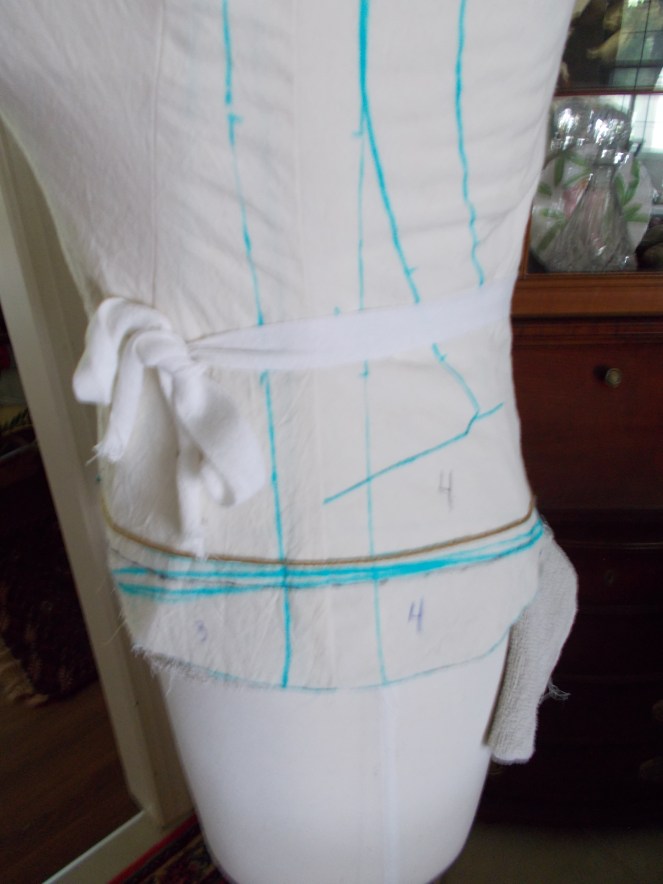
The Belt

Theater costumes fascinate me. Not only are they beautiful to look upon, but they also possess the most ingenious tricks for rapid removal without compromising the overall style. Surely, there must be staunchly guarded secrets on how best to employ the illusion.
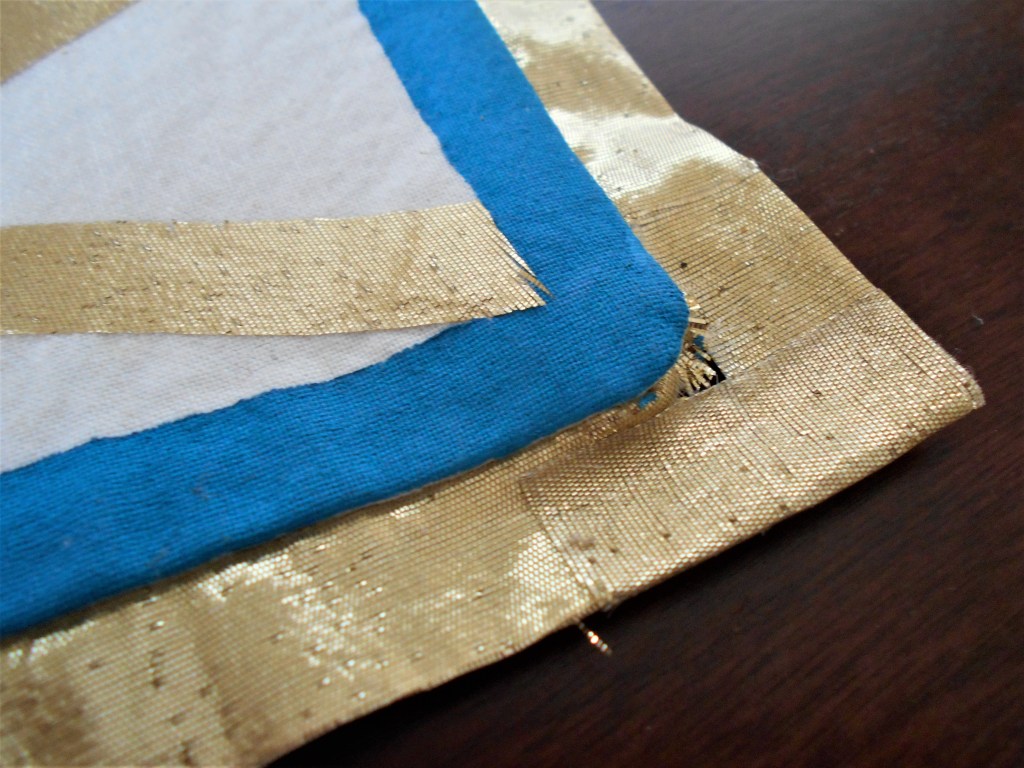
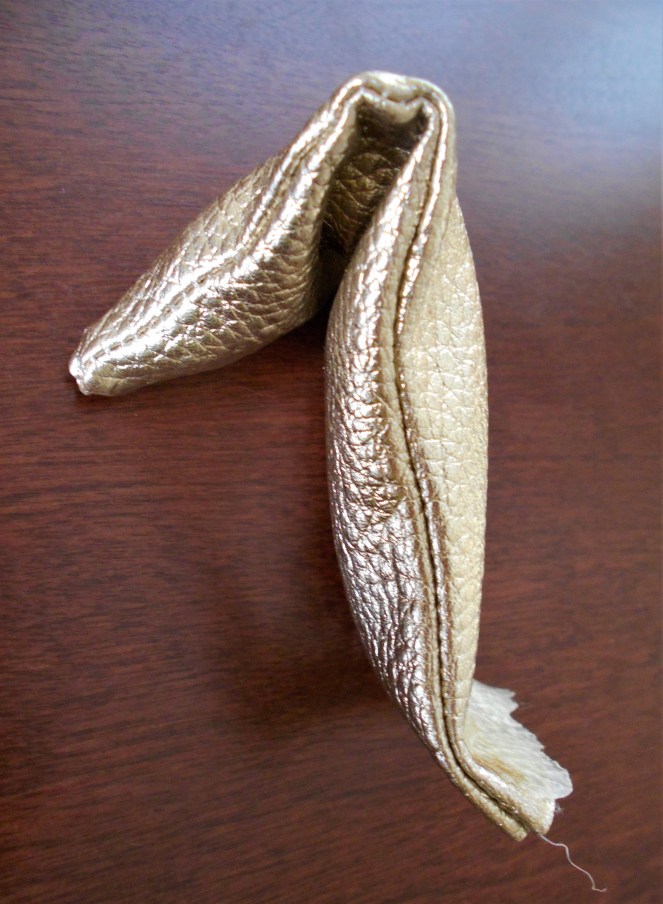
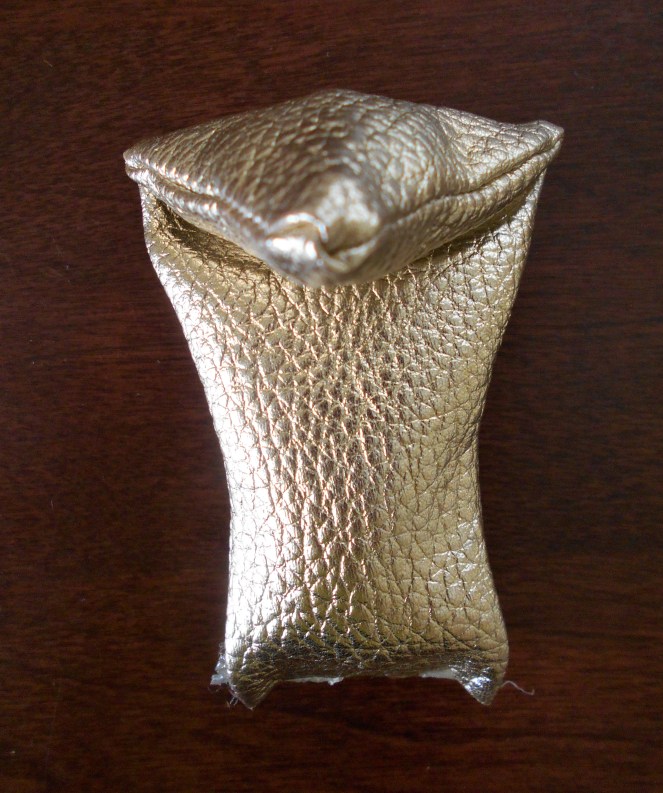
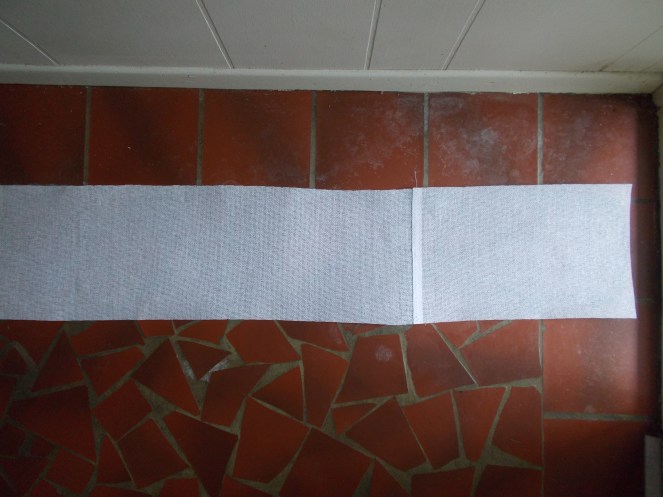
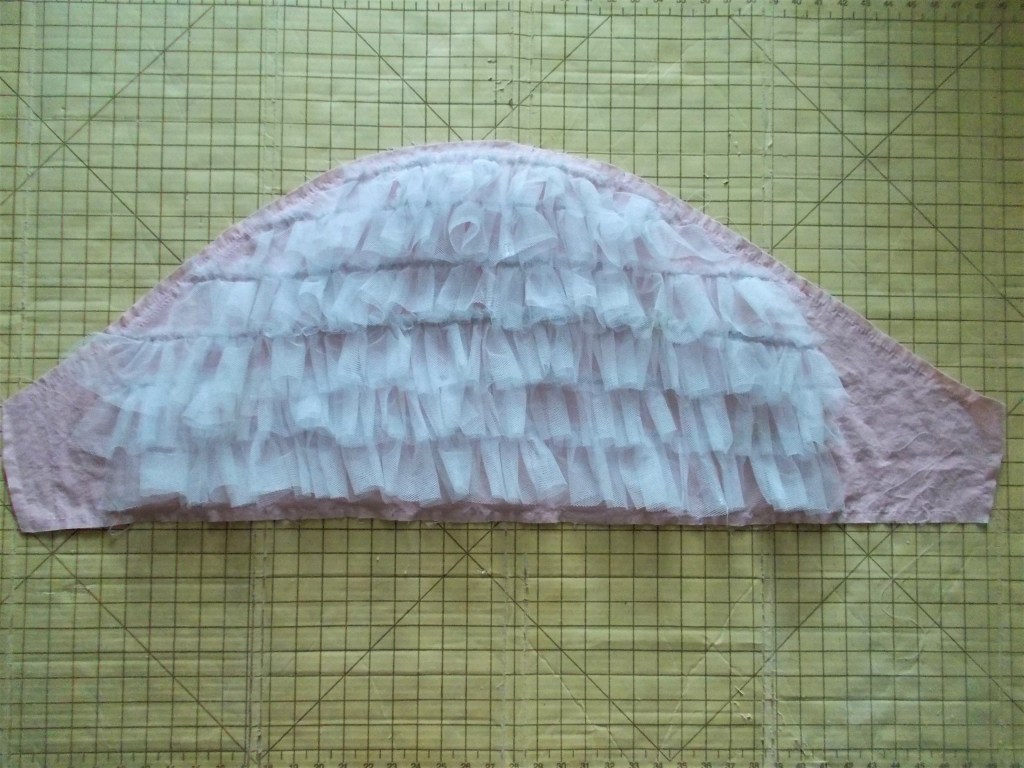
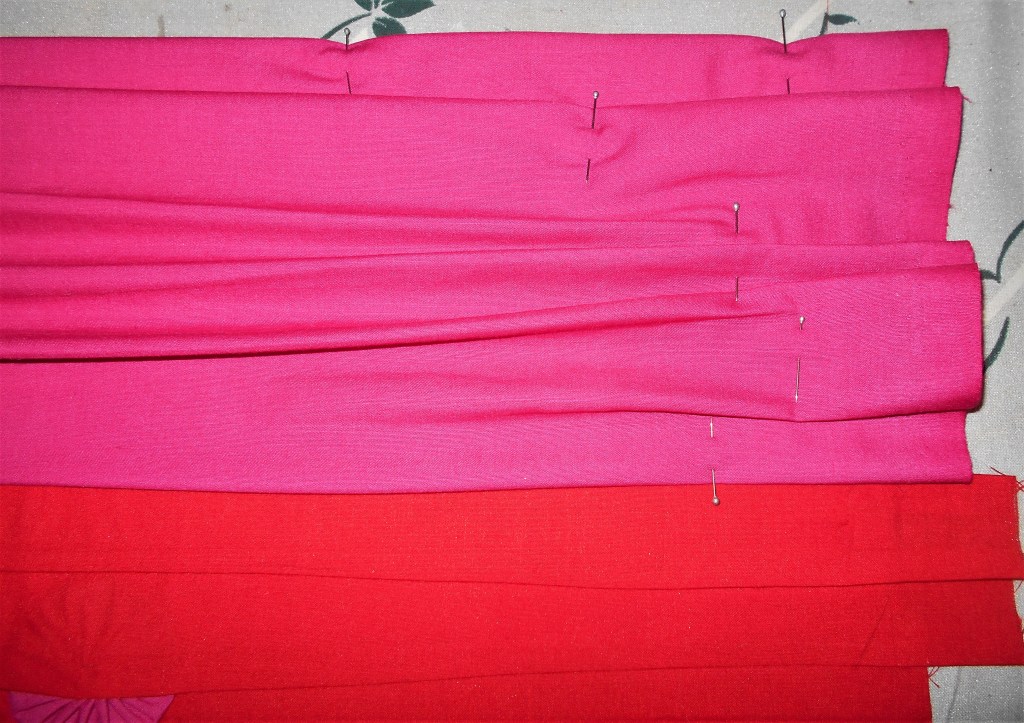
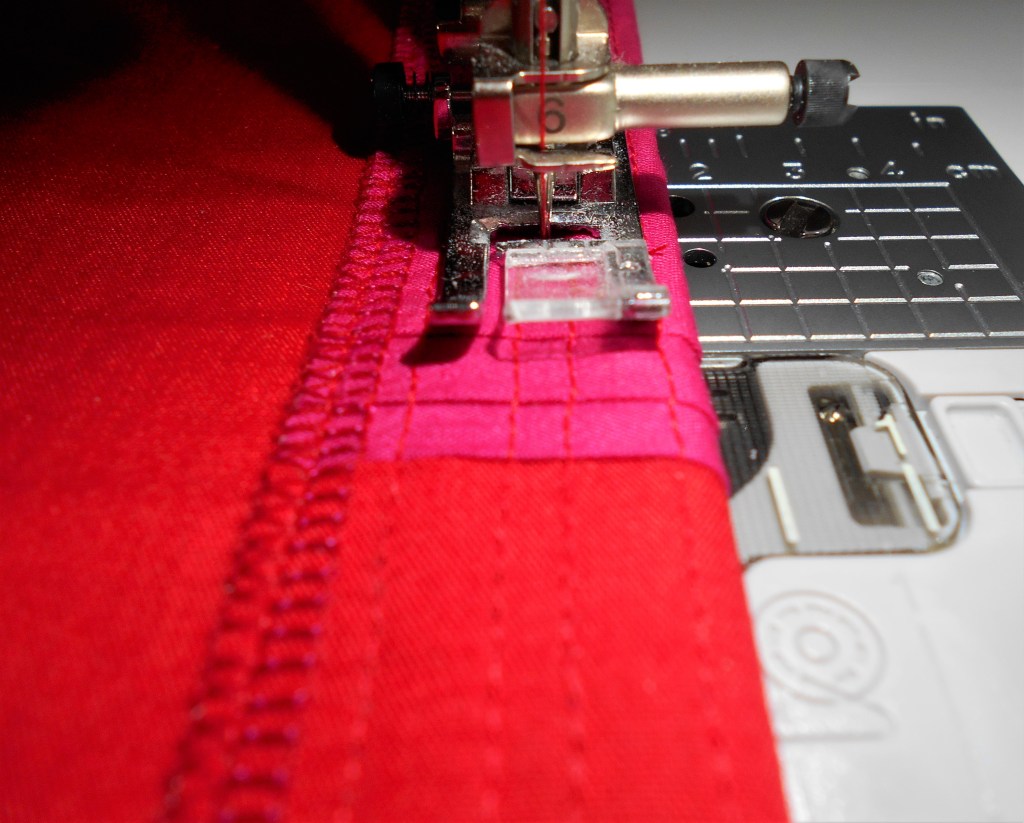
Instead of cutting a 30′ long strip of fabric and folding it over and over again, I imagined the belt being like a corset with the folded “knot” at the back being analogous to a modesty panel. And so I cut two wide rectangles and fused the the face layer with strips of double sided interfacing since there would be gathered drapes applied to the front.

The lower half of the front of the belt ironed in place while the top half remains unfinished

Have you ever wondered how random drapes are made ? It’s simple and a lot of fun ! Cut a strip of fabric that is at least twice the height of the area that needs to be draped. For example, each horizontal half of my belt measured about 15 cm (for a total width of ~30 cm, top to bottom) so I cut pieces of fabric that were over 30 cm each and stretched the swath side to side, placing pins where the folds and creases looked appealing to me.

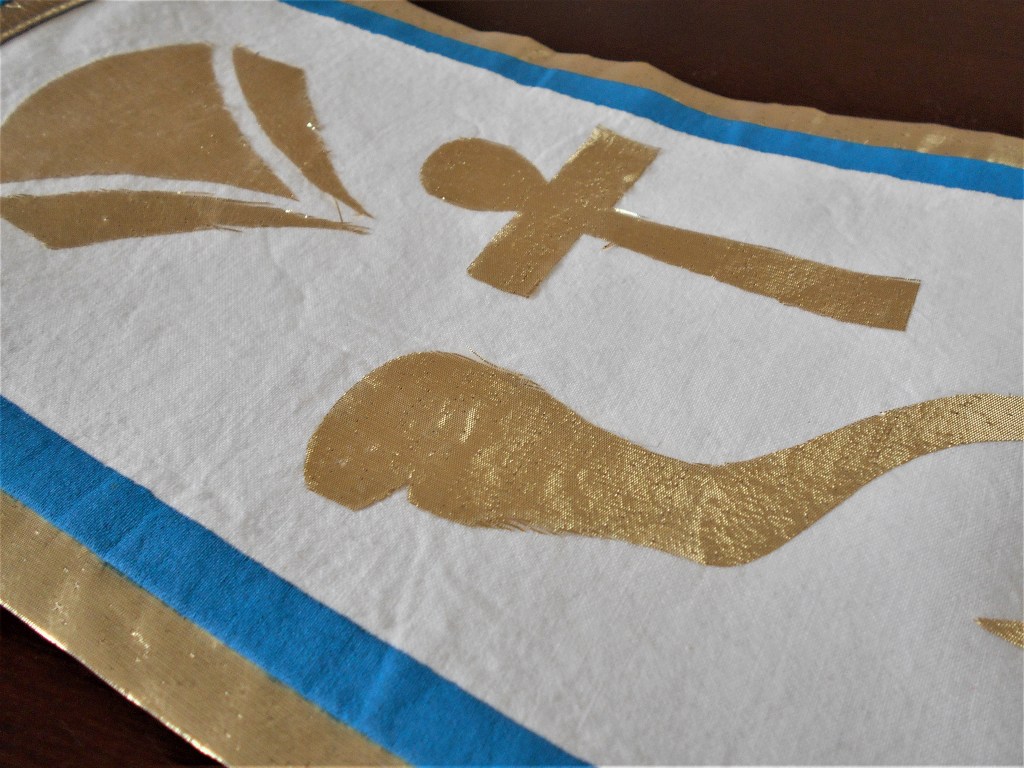
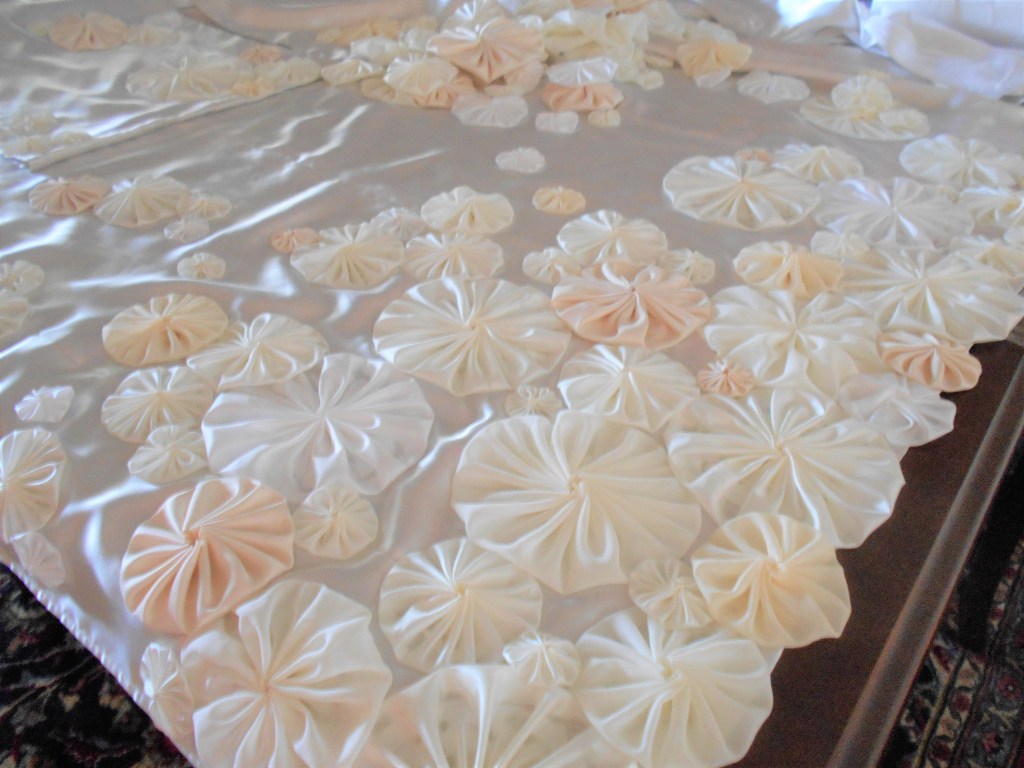
Once satisfied, it was time to steam press the folds that were pinned to the fusible web and then, voilà ! Secured drapes ! “Ah, but what are those round starburst “gears” peeking out from beneath the folds ?” you question. Those are called yo-yos, commonly made by quilters and used for handicrafts and decorations.

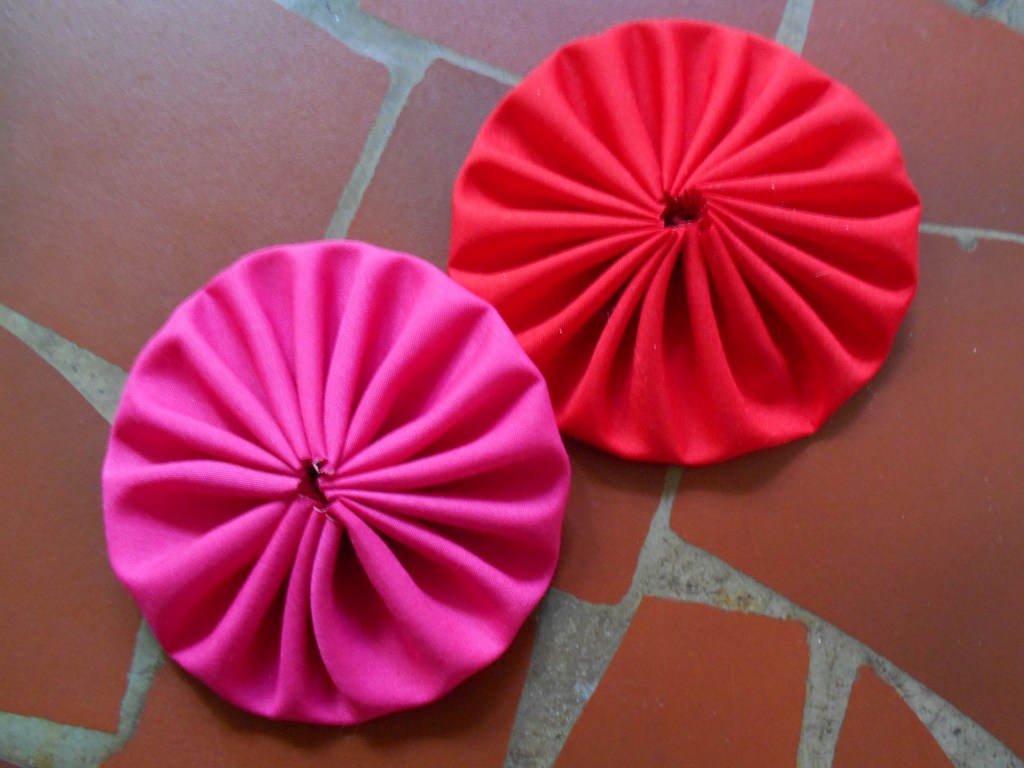
While they may not be the exact folded form of origami used on costume designer Han Feng’s stunning wedding kimono, I thought the shapes looked very similar to the humble yo-yo and therefore, I began the long and fiddly process of hot knife cutting and hand sewing the yo-yos into their recognized shape. I made hundreds of them !

Pillowy chiffon, shiny satin, bright broadcloth ─ from tiny to giant ─ mingled in a colorful array worthy of the distinction of ‘art’ on their own.

But back to the belt…

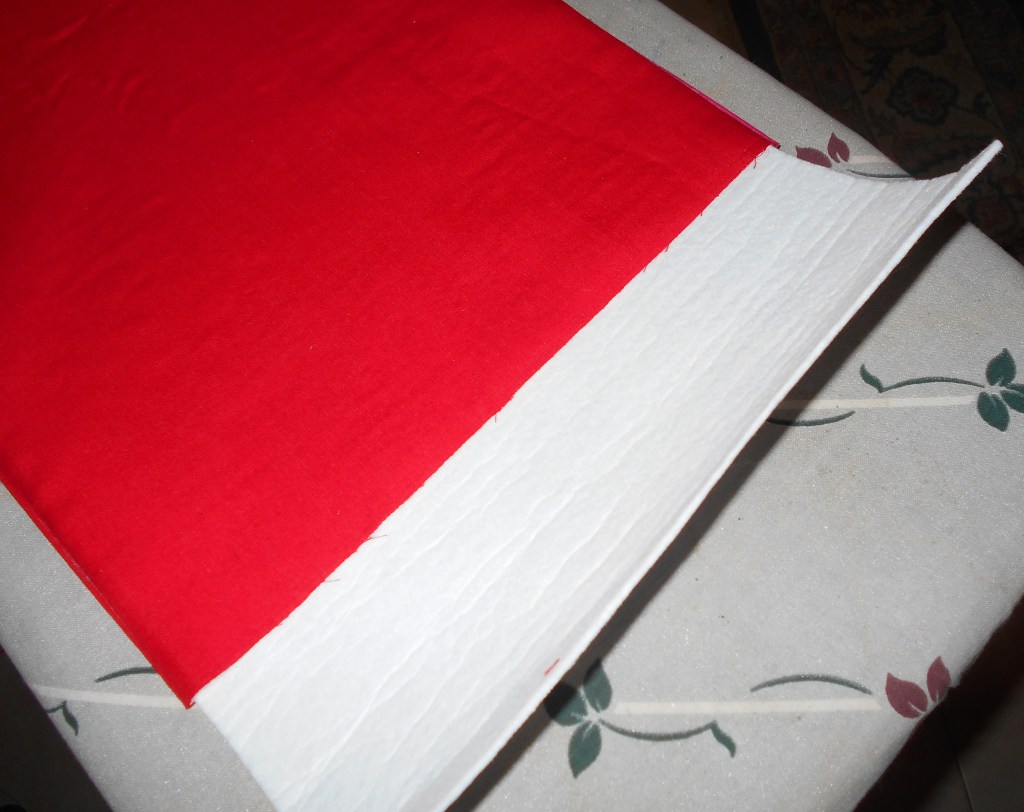
With the front portion complete, the lined belt needed to be stuffed with a stiffener so that it wouldn’t crease when sitting. First trying a thick felt, the result was undesirable. What would be stiff, yet pliable…??? Aha ! I remembered the leftover strip of buckram from the ball gown skirt for Manon and raced to find it. It was perfect ! I love when I can reuse materials for different projects.

The leftover buckram from Manon

The thick piece of felt, however, was not without its own fulfillment─ I still needed something stiff for the inside of the faux knot/modesty panel and it was used for this purpose.

Sliding the stiff white felt into the long stretch of fabric for the back “knot”

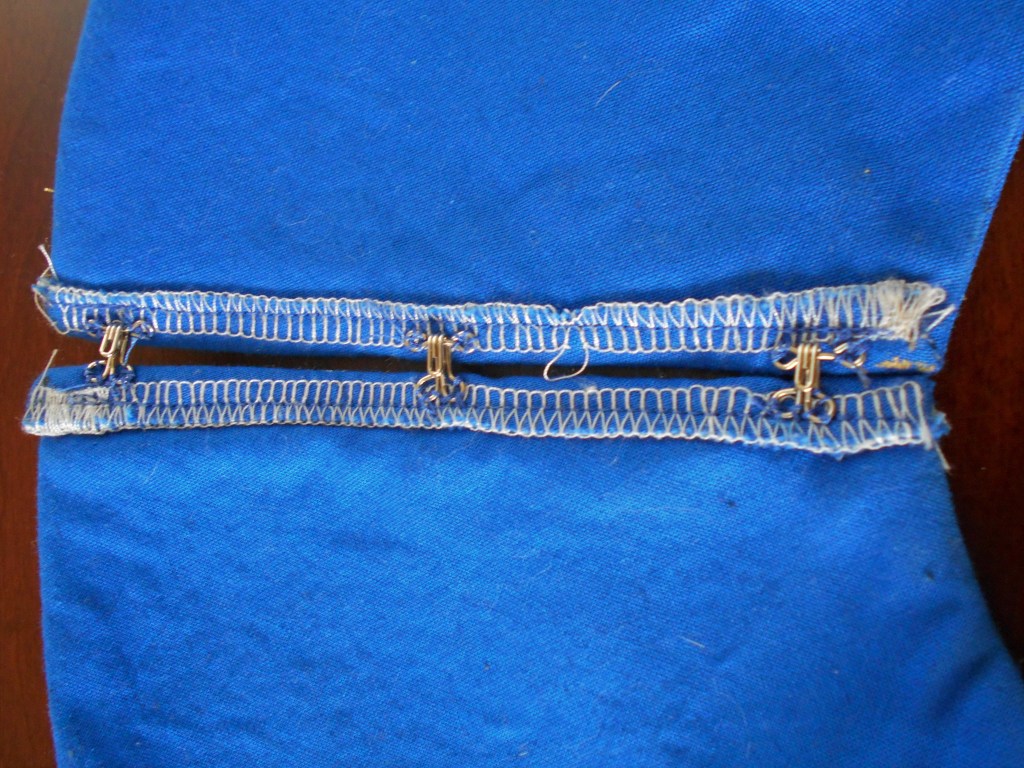
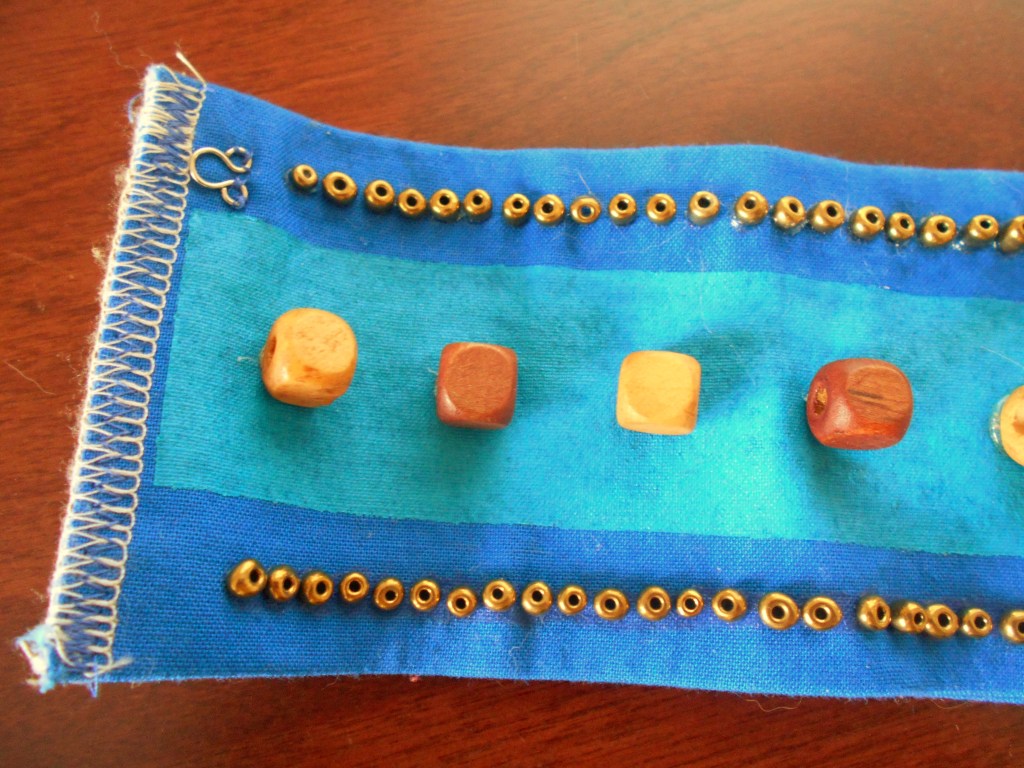
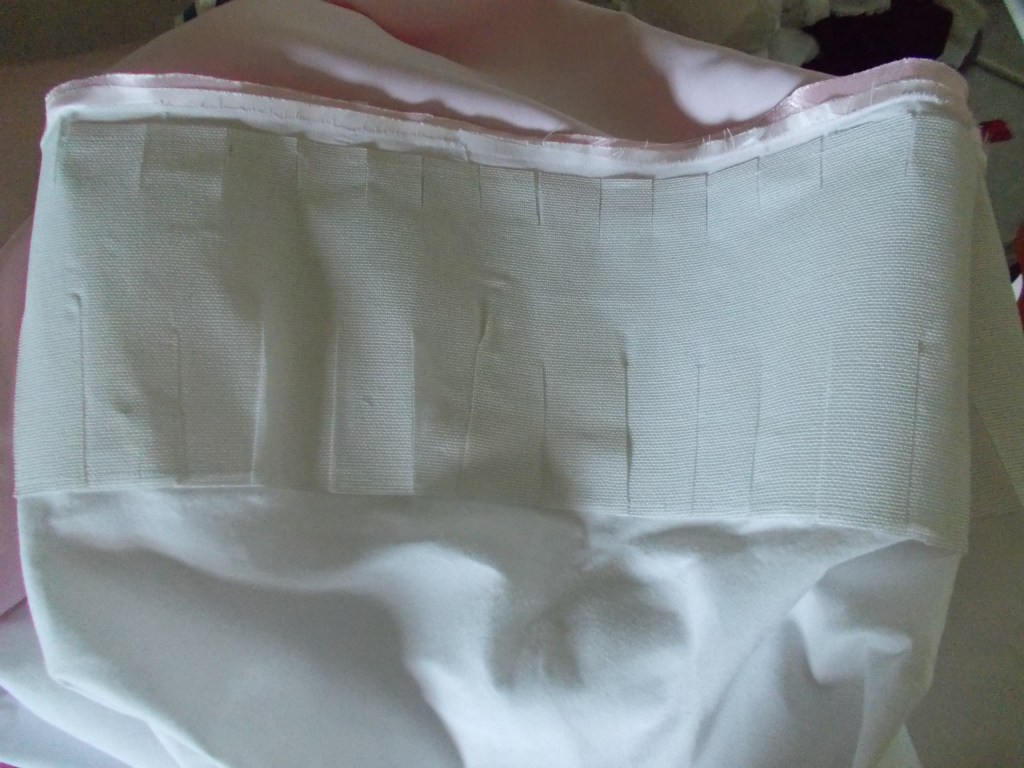
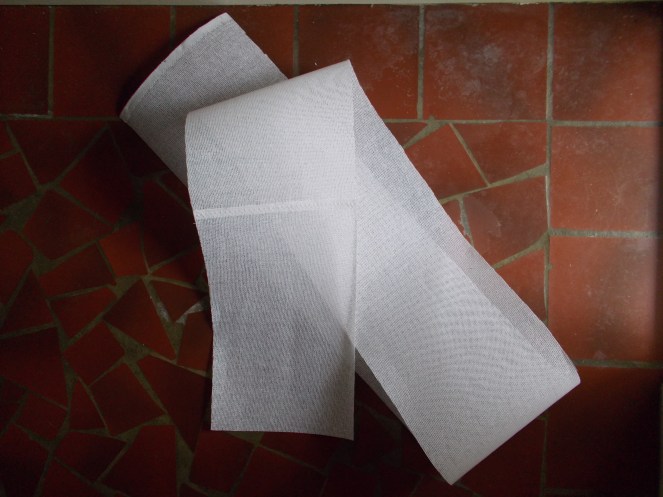
Two additional panels were made as part of the belt’s meeting closure; their back edges were stitched with Rigilene boning…

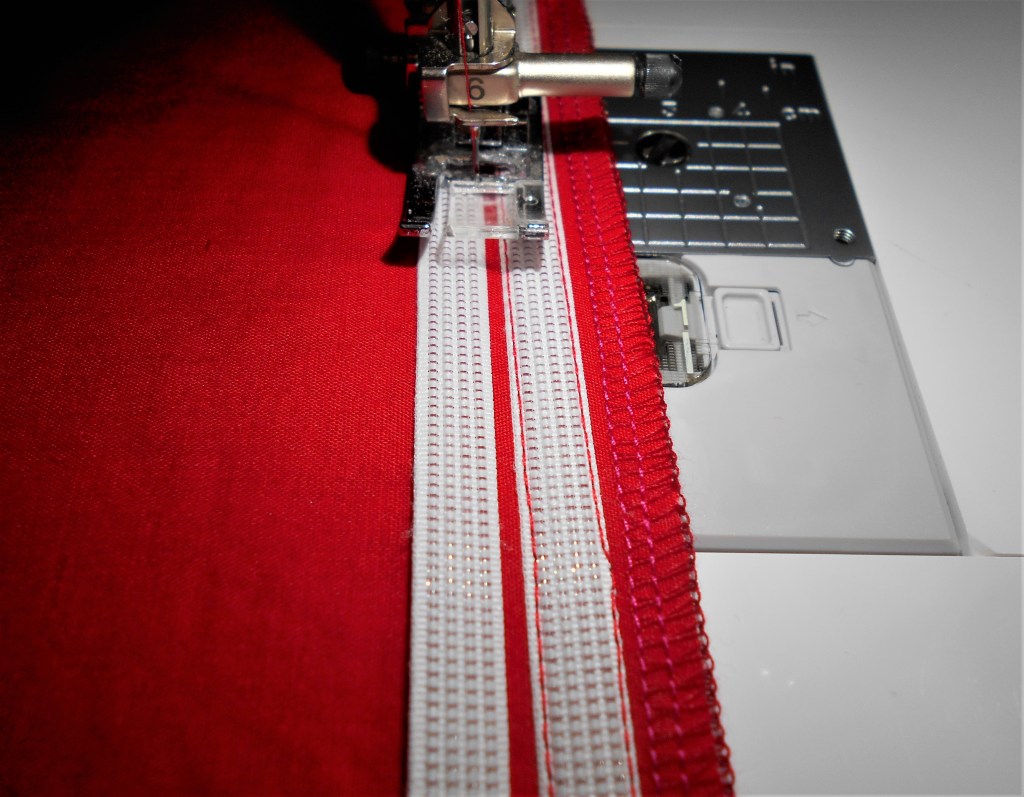
…then folded over and stitched in between the bones.

And here’s what the face side looked like afterwards:

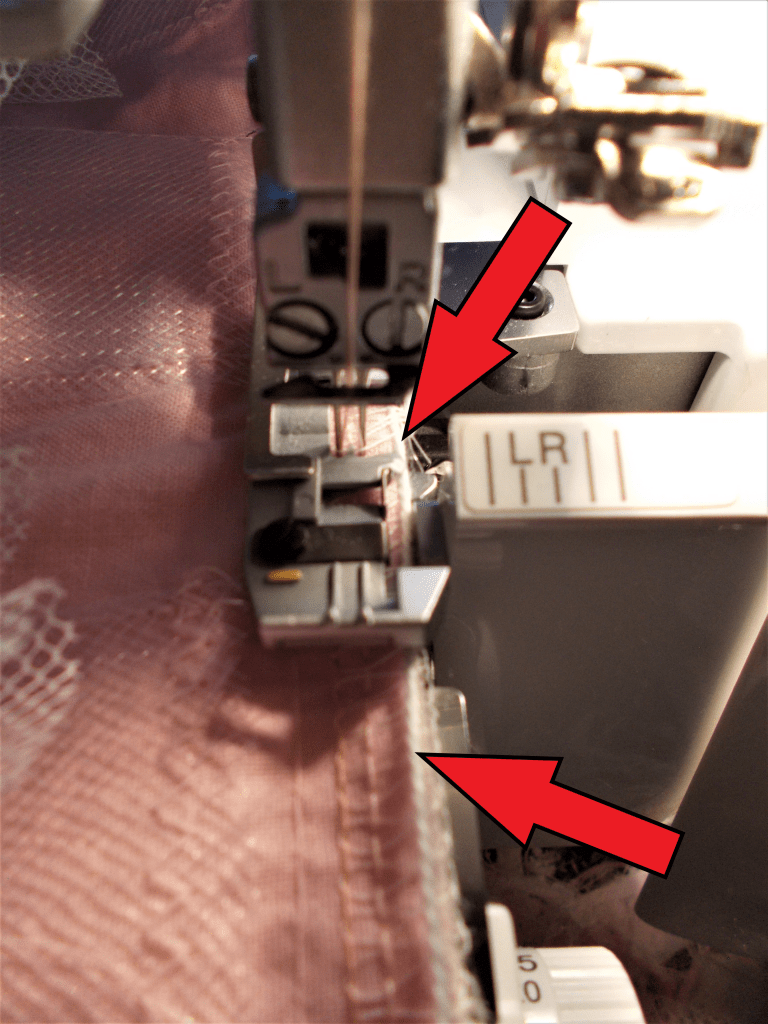
Time to punch the grommets ! The belt was nearly complete !
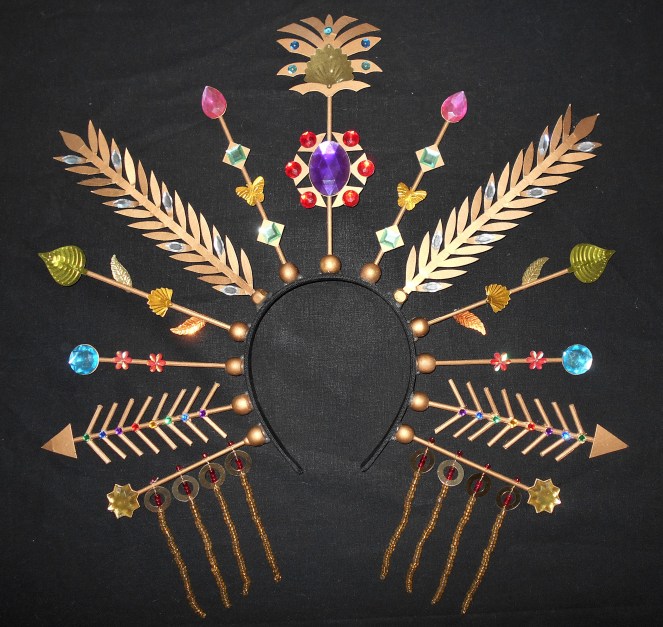
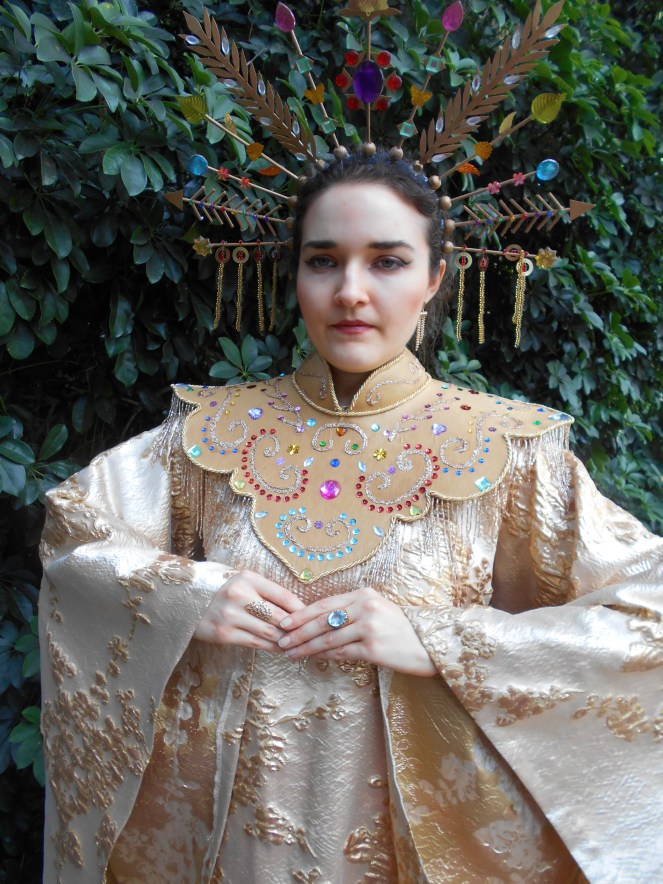
Decoration

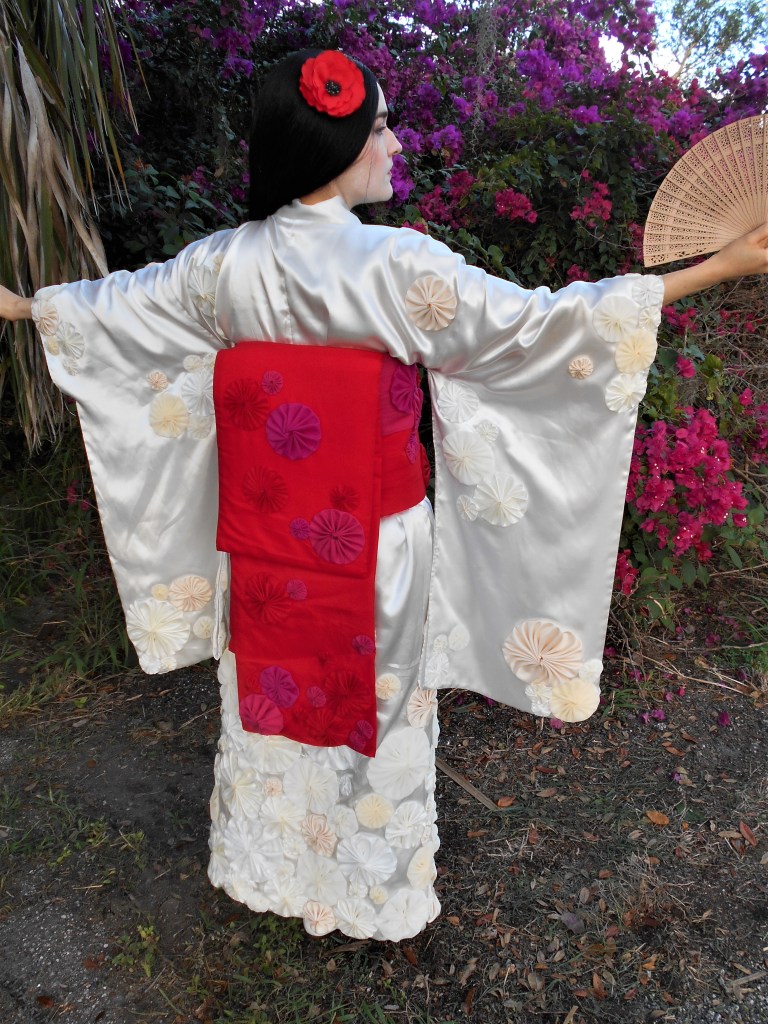
My deadline nearing, the wearisome work had begun. While I find it appalling to glue fabric onto clothes, Time sometimes forces me to bend on my tenets. There were many detailed photos on the web of Butterfly’s kimono and belt, but this picture was my guiding diagram when deciding how to arrange the yo-yos:

Maria Zichak as Suzuki and Ana María Martínez as Madame Butterfly / Metropolitan Opera

And so, I glued, and glued, and glued some more… I used two bottles of craft glue on those yo-yos and finally adhered the last one early Friday evening ─ the night before the opera ! Whew !

Progress made, but a mounded pile of yo-yos still to go…

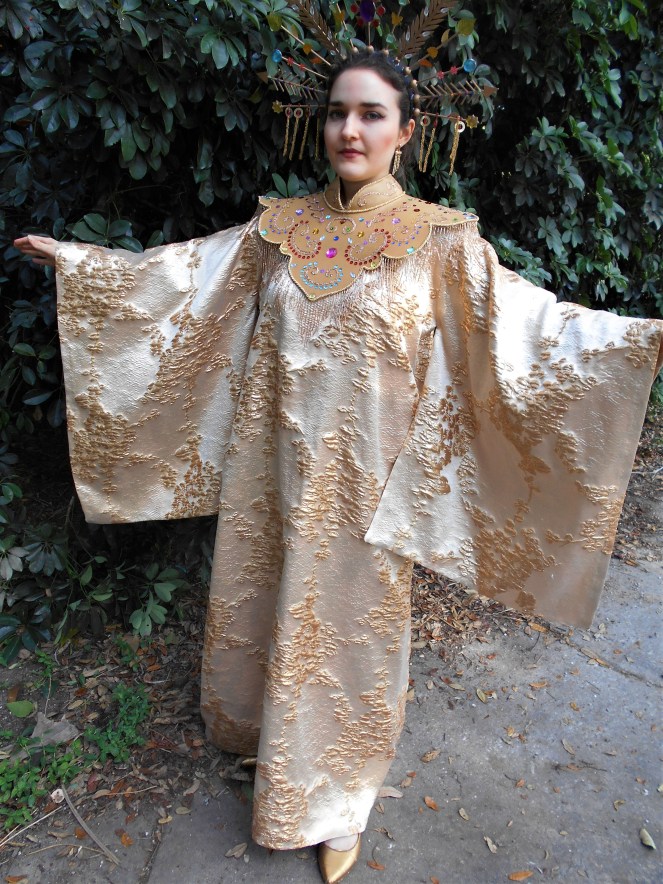
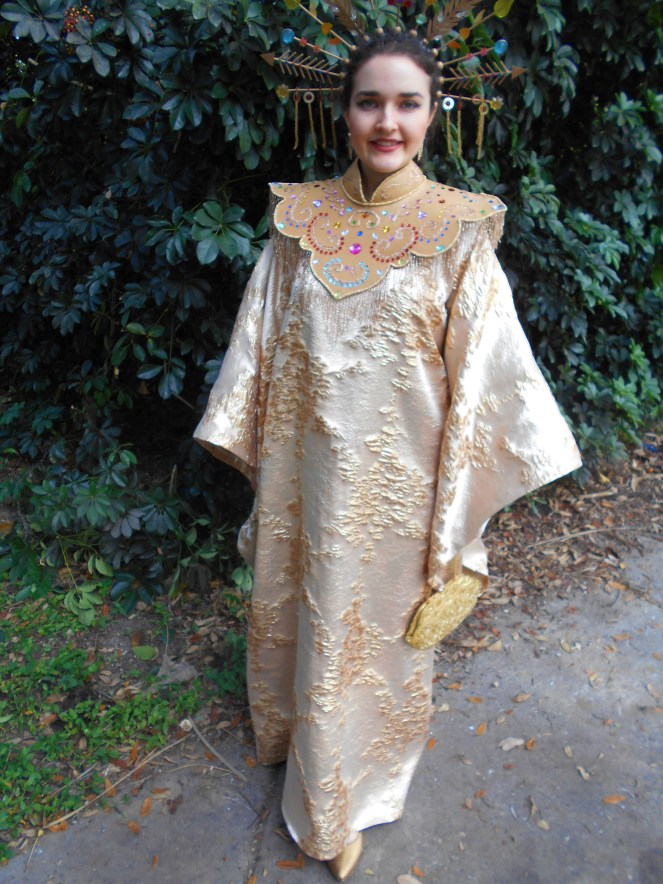
The glue dried with not a moment to spare and the following morning, I suited up in my silky kimono, applied a waxy whiteface, donned a long black wig, and clipped on a red poppy.

I just love that little wooden fan ! Its intricately cut panels remind me of ancient Far East traditionalism… Thank you, Aunt Countess !

The back of the belt held up well despite the futility of the sewn snaps I added onto the overhang. Never doubt the power of a few safety pins, my friends !

I bought the wig and the poppy clip from sellers on eBay and Etsy, respectively…

As much as I desired for the length of the sleeves to be much longer (and therefore, traditional, in that sense), there comes a point of practicality and whether or not I would be comfortable with the ends of my sleeves dragging in the dirt… grazing the dusty pavement of the parking lot… trailing along in the bathroom… NO !!!! Measurements are critical, and determining an appropriate length for the sleeves was no different.

Spreading my “wings”

Who would have guessed that the simple yukata I endeavoured to sew with nothing but gumption and the will to succeed would have bloomed into a passion of sewing costumes for cinematic opera productions ? For all the memories I’ve accrued over the years, I have Madame Butterfly to thank.

Toi, Toi, Toi,

Mary Martha

Amneris ─ from broadcloth to Egyptian glamour in less than a month

Oftentimes it is the lead female character of an opera which I try to portray in my costumes. Front and center, they usually have all the great arias while dressed in the most beautiful clothes. Although not necessarily a soprano, the prima donna is a personal delight to play. But sometimes it is the supporting actress, the seconda donna, who intrigues me more. Such was the case with Verdi’s Aida.

Anna Netrebko as Aida and Anita Rachvelishvili as Amneris in Aida / Metropolitan Opera

Egyptian princess. Heir to the throne. Most eligible woman in all the land. Seemingly, Amneris has it all. Yet her one desire ─ the love of the Egyptian warrior, Radamès ─ is denied. Jealousy flames and anger rages towards her slave, Aida, who has ensnared the heart of the princess’s beloved. Because of the meaty musical and acting material given to the mezzo-soprano singing the role, I knew playing Amneris would prove to be lots of fun. Now to plan my costume… but first, a note ─

Typically, I don’t feel comfortable creating a complex opera costume unless my deadline is at least two months in advance. But because of a serious fitting flaw with my gown for Samson et Dalila, my start time for Aida was enormously delayed. So with just a little over three weeks before the October 6th broadcast, I commenced work on my Egyptian ensemble.

Now back to the clothes…

It was a no-brainer. Now was not the occasion for interpretive gowns or my own conjuring of the character. With the Met’s current production spanning in existence for well over 30 years, there was little question as to what I would wear since the production’s costumes are as well-known as the opera itself. A doppelgänger I must be, more specifically, Anita Rachvelishvili’s twin.

Anita Rachvelishvili as Amneris / Metropolitan Opera

Opting to recreate the second of the character’s two outfits, an assessment needed to be made of each component of the costume:

  • Dress
  • Cape
  • Belt and Sash
  • Collar and Wrist Cuffs
  • Headband
  • Wig

The plain white cotton shift I could handle. The wonderful historical clothing and costuming website, Fashion-Era, provided helpful diagrams on how to map out my gown pattern, which was nothing more than a large length of broadcloth (double my height) folded in half at the shoulder level (crosswise) and then cut downward at a slant from each side of the shoulder to the corresponding selvedges, like a trapezoid, making sure to allow enough room at the bust and hip levels. Of course, I had a slight miscalculation and had to add gussets to widen the bust area after the first fitting.

Triangular gusset added to the side seams of the dress under the sleeve

The dress was hemmed at the bottom and a decorative Greek Key ribbon, leftover from my gown for Tosca, was sewn onto the sleeve openings to finish the garment.

Next came the piece that would turn the most heads and lower the most jaws: the accordion pleated cape, which was essential to Amneris’s second costume in the opera. Glimmering gold and fragile like paper, I knew tissue lamé would be the perfect material to use for the cape. But how to make a pattern for a pleated cape ? It sounded complicated. I was at a loss… until I stumbled across a children’s sewing pattern for Egyptian costumes on the web…

Simplicity 2329

I know, I know ! It sounds far-fetched and ridiculous to think that a kid’s pattern would be of any personal benefit to a grown adult. Although not the size of a child, I believed this pattern would afford me an excellent advantage in gaining a head start on my cape. No serious math equations for calculating width or number of pleats ─ all that was needed was to extend and enlarge the outlines that were already in place. An ingenious plan had been born. Acting upon the flicker of the figurative mental light bulb, I bought the pattern (in the smaller size set, no less !).

I confess, the steps I took to alter this pattern are blurred in my memory. There were some frustrations during the process, such as the bobbin repeatedly running out of thread during the endless basting, but the finished result was far more potent than expected as I attached the steam-pressed lamé cape with snaps onto the back of the white frock.

The baste stitching left small pinprick holes along the edges of each pleat.

Look how the cape falls in a shimmery waterfall down the back ! The sheen is as lustrous as the sun-flecked Nile.

Psst ! How many opera costumes can you spot and name in this picture ? Hint: there are 8 costumes in total.

With the cape and the shift under my belt, it was time to move onto the real belt and the standout symbolic sash.

Anita Rachvelishvili as Amneris in Aida / Metropolitan Opera

The Belt and Sash

Scrutinizing images like the one above, faux leather seemed to be the obvious choice to create the belt. However, finding it reasonably priced online was a bit difficult due to minimums per order, shipping costs, and negative reviews about the color tinges for some of my favorite options. But while perusing the aisles of Hobby Lobby, I spotted a bolt of bright gold upholstery faux leather, which was perfect for the project. I bought 12 inches and drafted a relatively straight band that arched slightly at the center front. Velcro was used to secure the belt in place. Easy on, easy off !

Some say that I’m “overkill” ─ the costume belt was lined and serged like a semi-couture garment.

The sash required more attention.

Hieroglyphic in their composure, the characters on the sash and belt present a story in their design. Thinking at first that I would paint these figures onto more of the broadcloth, I decided against that approach after realizing the appendage’s outcome would be much more effective if I snipped the characters out of scraps of the gold lamé used for the cape. Muted paint is no match for glaring metallic foil fabric ! Carefully studying the symbols, I sketched onto paper each figure and used them as a stencil. Then, after cutting the lamé, the pieces were glued onto the broadcloth sash in replica fashion.

Lamé frays ─ badly ! You can see below how the edges of the cut caricatures are splintering.

But I shouldn’t gripe too much; it is just a costume, after all. I bordered the sash with a long, folded strip of lamé sewn between the face and the lining of the sash. Teal paint added a pop of color to the cotton fabric and then, I was done !

Now that all the accompanying accessories for the base dress were completed, I was ready to take on the more elaborate portions of the costume, mainly the tedious tasks of decoration.

The Collar and the Cuffs

I knew that there would be numerous little trinkets and accouterments to this costume as it needed to resemble the full regalia of ancient Egyptian royalty. But I dreaded the teensy-weensy elaborations to follow. It’s true ─ when much time is spent on one or two dizzying details, I never feel like I’m making progress towards my goals. However, particulars matter, especially when recreating Amneris’s attire and signature style.

While it’s apparent that the gaudy, ostentatious collar worn by the mezzo-soprano in the opera largely consists of strung beads in all shapes and sizes, I did not have the time, resources, or budget to take on such a mammoth job. And so, I did my best to mimic the model piece using more broadcloth, paint, seed beads, and yes ─ lamé !

The front of the collar
Up close detailing of the collar

While Velcro was used on the belt, I preferred hooks and eyes for the collar closure.

Whoops ! One of the hooks snagged my serging !
The back of the collar. The lamé reflects the light brilliantly !

Similarly matching were the wrist cuffs, sans lamé. Please notice the eye sewn near the serged edge. Its importance will play a part later…

The Wig and Headband

Initially, my plan to create the hair for the wig was to knit a plethora of black yarn i-cords to attach to some sort of beanie cap. I knitted, and knitted, and knitted ─ both day and night almost ceaselessly. But with time running out faster than Arctic daylight in the winter, I began to seriously rethink my method. Troubled, I grasped for ideas. Then, coming to the rescue once again was the Simplicity child’s costume pattern.

Again ! Simplicity 2329

See those wigs ? They were included in the pattern envelope as well. Simply explained, the strands of “hair” were large rectangles of cotton jersey knit fabric, cut into measured strips from both lengthwise sides of the rectangle (but not all the way to the middle !). And then with a tug of each strip… voilà! Deftly furled locks of hair.
It was the Monday before the opera and with only 5 days left to complete my heretofore unfinished outfit, I jettisoned the i-cords in favor of the expedient children’s pattern. While the pattern had particular blocks for constructing the wig, I bypassed these since I knew they would be too short for my desired hair length. Haphazardly, I stitched segments of the pulled cotton jersey onto a crocheted cap I had formed earlier.

Yarn stretches. I learned this during the opera when I found the wig sliding off my head ! A band of elastic needed to be sewn around the inside of the bottom edge of the cap.

The gold “beads”, which were dynamic in their effect, were fashioned out of… scrapbook paper ! Who would have guessed ? Thinking logistically of the potential weight of the wig, I reasoned that nearly anything heavier than a feather would be too excessive when multiplied by the number of “beads” needed for the strands of hair. Real beads ─ wooden or plastic ─ were out of the question. Paper seemed the likely solution. So when I chanced upon a gilted crosshatch patterned paper at Hobby Lobby, I said, “Bingo !”

Paper beads ? Check ! Hot glue strings ? Check !

My only regret about the scrapbook paper is that I didn’t buy enough ! Two 12″ x 12″ sheets sliced into ½” strips were not sufficient to wrap the entire mass of coiled knit locks. But alas, it had to suffice.

A latent cobra, poised and ready to strike, was the concluding element to an ensemble crammed full of indispensable details. Would you like to guess where I found its pattern ? Why, yes ! The same children’s pattern that already served me so gallantly on more than one occasion. This time, I only used the head portion of the pattern and slid a wire into its pleather skull along with a small wad muslin for added dimension. With the cobra head completed, it was hot glued to a band of the same faux leather where it sat looking down as ruler and judge.

While most might believe that I finished my costume with plenty of time to spare, such sentiment was untrue. It was late Friday afternoon, the day before the opera, when I unplugged the hot glue gun once and for all, resigning myself to a completed job. A close call, indeed !
All that was needed was exotic make-up and gold sandals whereupon I became Amneris, ancient Egyptian princess, for a cinematic Saturday afternoon.

Remember the eyes on the wrist cuffs ? They were used in conjunction with the hook counterparts attached to the edges of the cape to lift its shiny crimped folds into the sun. Marvelous was its impression.

Although the costume was completed in time for the opera, I have no desire to ever be so pressed to meet a deadline as I was for this project. Talk about stressful ! But there is great moral to this story and that is to never count out a pattern that doesn’t fit the bill at first glance. Deeper inspection and a dose of imagination were all that were needed to turn a child’s costume into an adult’s deliverance.

Toi, Toi, Toi,

Mary Martha

Turandot (2019)

Hope. Blood. Turandot ! If my first brush with opera in 2015 hadn’t of been so life-altering, Puccini’s grandest spectacle (and final opera) would be the undisputed favorite of my heart. I remember when I first saw the opera in theaters in early 2016: it was the encore showing the following Wednesday evening since I was out of town for the live Saturday matinee broadcast. So monumental was the feeling I had while witnessing the story unfold on stage that when the Met announced that Turandot would be returning to theaters in 2019, I jumped on the affirmative decision faster than a Ferrari at top speed.

Turandot has everything. There’s drama, romance, passion, mystery, sacrifice, joy, and best of all, some of the most heart-pounding, resplendent music your ears will ever hear. The emotional power behind the fearless and triumphant aria, “Nessun dorma”, sends me to the brink of tears while elevating me from my terrestrial state. There are many renditions on the web, but I am especially moved by the English/Italian translation of the Pavarotti performance below. Divine !


Luciano Pavarotti singing “Nessun dorma” (video: MeastroPava4Ever)

As much as I adore the greatest tenor aria ever written (and that is not an exaggeration), my favorite moment in the opera comes during the high-stakes Riddle Scene showdown. Regardless of how many times I’ve seen the opera and know its plot inside and out, I can’t help but think I’ve missed something and fear a fatal slip-up by Calàf. Thankfully, my trepidation is always unfounded.

Christine Goerke and Yusif Eyvazov in Turandot / Metropolitan Opera

While this performance of Turandot had its plusses (Eleonora Buratto’s Liù) and minuses (an overly sensitive Calàf), the reigning winner is still Franco Zeffirelli’s magnificent production. Everything from the sets and costumes to the choreography of the chorus is perfectly enacted for an otherworldly experience. The feeling is magical. Your breath is taken away.

Yusif Eyvazov and Christine Goerke in Turandot / Metropolitan Opera

Heavily influenced by traditional Beijing Opera, the characters in Zeffirelli’s extant 1987 staging of Turandot are loaded with symbolic make-up, ornate robes, symmetrical cloud collars, and other brightly colored embellishments. As I contemplated the design of my costume for the 2019 Turandot, I had one prerequisite: whatever I wished to make HAD to coordinate with the headpiece I created for my 2016 outing since I was pressed for time (ahem, Manon) and didn’t want to fiddle with the engineering logistics of building a new headpiece from scratch.

The headpiece worn to Turandot in 2016

With guidelines established, I fashioned my outfit entirely around the color scheme of the headpiece: predominantly gold with LOTS of colorful jewels ! My friend, Judy, snapped this picture during the intermission at the theater:

The Turandot “death stare”… Thank you, Judy !

The brocade robe was self-drafted using only the measurements of the shoulder width and hem diameter. The sleeves were long rectangles folded in half out of the pillowy metallic material and sewn together at the bottom edge.

Creating the cloud collar was not as straightforward. Studying the specimen from the opera, I fiddled with drawing a quartered pattern using a compass as well as freehand curves.

Drafting the cloud collar

With just a few tweaks, the finalized pattern, which I copied onto newspaper, turned out great ! The full 4 quadrant newspaper replica was then taped to a sheet of thin foam, leftover from my Valkyrie days, and cut from its pliable surface as well as two layers of mustard colored stretch taffeta.

Pattern cut from newspaper

Through trial and error, the separate pattern for the pop-up mandarin collar was finally completed to my satisfaction and applied the foam and taffeta in the same manner.

Finalized Mandarin collar pattern

All that was left was the decoration ! The hot glue gun and I have an on again/off again relationship, but for Turandot, we were most definitely on !

Thank you for the fan, Faith !

My Chinese robe on the cheap made me feel like a citizen of Peking attending the riddle ceremony ! Careful, Calàf !

One mention of my shoes… those ballet flats ? Well, they’re not really gold. They’re white. And I bought them specifically to wear with my Empire gown to Tosca in 2018… certainly not Chinese ! But dousing dollars on new shoes for a one-time occasion is not really my style. The level of the flat was right ─ the hem of my robe wouldn’t allow for any height of heel ─ and so I changed their appearance temporarily with gold colored duct tape.

Without question, Zeffirelli’s majestic Turandot is my favorite opera in which to introduce a complete newcomer. Maybe the next time Turandot returns to the Live in HD schedule, you’ll be my first-timer and the spell of Puccini’s score will bewitch you with its undeniable magic.

Toi, Toi, Toi,

Mary Martha

Cast and Credits:

Turandot ─ Giacomo Puccini (1926)
Live in HD air date: October 12, 2019

Cast:
Turandot ─ Christine Goerke
Calàf ─ Yusif Eyvazov
Liù ─ Eleonora Buratto
Timur ─ James Morris

Credits:
Conductor ─ Yannick Nézet-Séguin
Production ─ Franco Zeffirelli
Set Designer ─ Franco Zeffirelli
Costume Designers ─ Anna Anni, Dada Saligeri
Lighting Designer ─ Gil Wechsler
Choreographer ─ Chiang Ching
Live in HD ─ Gary Halvorson
Host ─ Angel Blue

The Making of Manon: the 1890's ball gown

When pondering a new project, I always search for that one piece of inspiration to set the creative gears into motion. It can be a pair of shoes with just the right decoration for mimicking on a collar, or a necklace from ages past that would look perfect with a historical replica gown. For Manon, that trinket of musing was this pink and silver butterfly barrette:

Pale, frosted pink with touches of mauve and iridescent rhinestones gave me great ideas for the color scheme of my Belle Époque outfit. Determining whether I would create a walking suit, day dress, or evening/ball gown became the main challenge as I vacillated between contrary designs like a pendulum swinging from a string. Ultimately, a ball gown seemed like a safe choice since I knew that it would be rather simple in construction and wouldn’t limit my comfort or mobility the way a spectacularly broad daytime hat would against the back of a movie theater seat (I have experience in these matters, as surely you can tell). I did, however, sketch a design in the vein of one of Laurent Pelly’s signature looks from the opera:

Manon / Metropolitan Opera

Once the decision was made in favor of the ball gown, I settled on the 1890’s for my gown’s impersonation since La Belle Époque (The Beautiful Age) spans well over 40 years (roughly 1871-1914 by generous standards) with varying fashions in each decade. Now to narrow down the style of the neckline, sleeves, and skirt…

The gowns of the decade were bedecked in fancy laces, expensive jewels, and lavish ornamentation. Most noticeably were the enormous puff sleeves and long evening gloves worn by the ladies.

The decoration of the gores on the skirts was also in vogue.

As for me, I wanted a trademark 1890’s style, which meant a separate, softly pointed bodice and gored fan skirt trailing behind ─ both cut from pale pink crepe back satin and decorated in contrasting rosy mauve corded lace. Making a mock-up was the first order of business. I designed my bodice to have shoulder straps that opened wide onto the chest and a pointed bottom at the front and back, which was characteristic for the time period.

Once the bottom edge was modeled to my satisfaction, I cut along the line and had my new patterns pieces, which were then laid out onto interfaced cotton lining fabric.

Covered Rigilene bones were sewn onto the front princess seams in addition to one bone down the middle of the face side of the lining while other bones were sewn onto the bust portion of the bodice to give it shape and support.

Onto the back !

A minuscule waist was at the forefront of the iconic 1890’s silhouette. While the broad design features of bouffant sleeves and sweeping skirt hems aided in the appearance of a tiny waist, I wanted to be sure that I did my best to achieve the proper look and decided to make a built-in corset in the bodice. The attached lacing panels are shown below. Each panel has two sides: one for the lining (cotton) and the other for the side facing the back (satin).

Next came the skirt…

Doing my best to keep the gown fairly accurate, historically speaking, I made a pattern using measurement instructions given in Janet Arnold’s Patterns of Fashions 2, an invaluable resource for fashion historians and sewing enthusiasts alike. Seam allowances were added and then the paper pattern was pinned to folded layers of crepe back satin (face), lining fabric, and interfacing to save time on the cutting process.

The interfacing was fused to the wrong sides of the face and lining fabrics and set aside for later…

After sewing together all the pieces of the bodice, pressing the seams, and stitching quilt batting onto the bust to cover the exposed bones, it was time for a fitting !

The fitting indicated that the armscyes needed to be cut down slightly since it was jabbing into my underarm area in a most uncomfortable way. (Later on I would cut down the armhole even more since it was still bothersome.)

A portion of the armscye cut down.

Let’s get back to the skirt…

As per Patterns of Fashion 2, the hems of the fancy skirts in the 1890’s were interlined with buckram in order to keep them stiff and stand out and away from the wearer. This was essential in creating the proper figure that I wanted to achieve so I bought 1 yard of heavyweight buckram and cut it into strips based on the equation of the circumference of the skirt divided by the width of the buckram. If I remember correctly, I think I ended up with 8 strips that were 56-57″ long (the width of the buckram) and about 7¼” tall. Sewing the strips together gave me one long strip of stiffener.

The edge closest to the hem was sewn on first. Then to compensate for the decreasing skirt circumference higher up, I made long cuts into the buckram along the top edge (and shorter ones along the bottom) to help bend the stiff mesh into a circular shape.

Below shows how the interlining looks from the inside. There are two lines of stitching for the buckram (top and bottom) and then the pink outer face fabric was turned to the right side and the seam allowance topstitched to the inside.

All was pressed and ready to be pleated at the back. A simple waistband was added to the top, hooks and eyes were sewn to the band, and the skirt was ready for decoration ! Lovely, isn’t she ?

Calculating that it would take over 5 yards of lace trim for the bottom hem of the skirt, I purchased 3 yards of a sequined corded lace with double scalloped borders in the rosy mauve hue that would serve as the accent color, just like in the butterfly hair clip. Of course, the two selvedges of scallops gave me close to 6 yards of trim, which I snipped off and pinned their lengths in place onto the skirt.

Now, just between us, I glued the bottom border of lace onto the skirt with a clear fabric glue. I had no other choice ! If it’s early June, then I’m most likely going to hand sew the lace. But with only a month before the October opera and a bevy of other projects waiting half finished on my ironing board…well… Toss me the bottle of glue ! I did hand sew the rest of the lace, however, including the motifs along the two seams of the front gore, which took 3 hours EACH to complete. Yes, the glue saved me !
The skirt was complete (other than hanger straps, which I added later) and then it was onto the sleeves ─ the massive, puff sleeves.

The Sleeves

Perfecting the fit of a sleeve has always been an elusive task for me. They’re either too tight, too lopsided at the top, or just plain unsightly. Sometimes, I want to give up. Since I didn’t want a failure with my 1890’s ball gown sleeves (they were, after all, consuming almost a yard of fabric each), I counted off the number of squares on a layout in Patterns of Fashion 2 and my sleeve block turned out great with only a few tweaks. Below is my sleeve pattern with markings for the front, back, and shoulder seam. However, in the process of sewing and attaching, these factors were not so important and I ditched the idea of lining up the points with those on the bodice straps. You’ll see why in a minute…

Three layers of the sleeve pattern were cut:

  1. cotton lining
  2. interfaced crepe back satin
  3. crystal organza

After staystitching the edges, strips of horsehair braid were vertically sewn along the wide section of each sleeve at evenly spaced intervals. This provided a structured “oompf” and ensured that the sleeves would not droop. Next came a row of ruffled crinoline to begin building the “fluff” in the sleeve.

And then more rows of crinoline, and more, and more until the sleeve looked like this:

It almost looks like a pink and white lamb ! Baahhh !

Time to join the layers together…

…and gather the tops and bottoms.

And this is where things got tricky. Because it’s infinitely easier to gather and serge at the same time, I opted to use my serger to knock two balls out of the park after striking out with machine gathering ─ no matter how careful I was to not pull too hard on the thread tails, snap ! A thread would break. Frustration set in. Finally, it dawned on me to gather the sleeves on a cord so I went back to the serger and tried this trick. Guided by the red arrows, you will catch a glimpse of the white cotton crochet cord.

Eureka ! It worked ! From there, the sleeves gathered with remarkable ease.

And here’s what the bodice looked like after the sleeves were fitted to the straps. Sparkly, shiny, and fit for a princess, wouldn’t you say ? Time for a fitting !

A disaster: The inner support materials of the sleeves proved to be much too heavy for the wide set shoulder straps and as a result, the bodice became an “off the shoulder” style, which was not my intended look. I tried using lingerie tape under the straps to help them stay in place, but the copious amounts of horsehair and crinoline won out every time. Back to the drawing board…
The seam ripper and I have a very close relationship and it was in action again with this project. I picked apart the sleeve layers, removed half of the horsehair strips, and reduced the number of crinoline ruffles before serging together the layers ─ again. Thankfully, my fear of having droopy sleeves due to a reduction of inner support was unrealized and once reassembled, they still possessed that iconic “poof” with no signs of droop. They remind me of swim floaties worn on the arms of children who are learning to swim.

A fitting was carried out and STILL the straps were falling down, just not as quickly as before. Only one thing could be done to salvage my hopes of keeping the straps on my shoulders and that was to somehow shorten the length of the strap. This was done by pinching together a back portion of each strap and sewing it down by hand. It sufficed, but wasn’t pretty. Fortunately, the corded lace sewn onto the bodice covered any obvious imperfections.

Pinched portion of back shoulder strap sewn down by hand stitches

Completing the look was the beautiful rosy mauve lace I bought online from a Los Angeles fabric store. Snipping out varied motifs was necessary, but tedious at times, and don’t get me started on how much of a brain buster it was to match mirrored pieces ! I think I scrutinized each scroll of the lace pattern until I couldn’t see straight ! But, the devil is in the details and it paid off in the final outcome.

C’est très chic, n’est-ce pas ?

With the final touch of the butterfly clip ─ the source of my inspiration ─ perched atop my updo, I felt like I had stepped back in time to the grand days of Paris in the 1890’s. The dress gave me fits during construction, but not at the opera ! It was a dream to wear. Now, if only I had a Chevalier des Grieux on my arm and a fancy ball to attend…

Toi, Toi, Toi,

Mary Martha